
Easy tiramisu is an Italian no-bake dessert made by layering espresso-soaked ladyfingers with a creamy mascarpone filling, then chilling until set — typically 4 hours or overnight. You don’t need a mixer, oven, or special equipment: just a bowl, a whisk, and a baking dish. The result is a silky, coffee-kissed dessert that tastes like it came from an Italian café.

What Is Tiramisu?
Tiramisu (pronounced teer-ah-mee-SOO) is a classic Italian dessert whose name literally translates to “pick me up” — a nod to the espresso and cocoa that give it a gentle caffeine kick. Originating in the Veneto region of Italy in the 1960s, it has become one of the most beloved desserts worldwide. Traditional tiramisu uses raw egg yolks whipped with sugar and mascarpone, but this easy version replaces the raw eggs with lightly cooked egg yolks (or omits them entirely for safety), making it accessible for home cooks of every skill level.
The key components are simple: ladyfinger biscuits (savoiardi), strong espresso or brewed coffee, mascarpone cheese, heavy cream, sugar, and cocoa powder. Some recipes add a splash of coffee liqueur or rum — entirely optional, but delicious. This recipe skips the alcohol for a family-friendly version that still delivers all the flavor.
Ingredients You’ll Need
This easy tiramisu recipe serves 8–10 people from a standard 9×13-inch baking dish. Here’s exactly what you need:
- 24–30 ladyfinger biscuits (savoiardi) — find them in the international or baking aisle of most grocery stores
- 1½ cups strong brewed espresso or very strong coffee, cooled to room temperature
- 16 oz (450g) mascarpone cheese, at room temperature
- 1½ cups heavy whipping cream, cold
- ½ cup (100g) granulated sugar
- 1 tsp pure vanilla extract
- 2–3 tbsp unsweetened cocoa powder, for dusting
- Optional: 2 tbsp coffee liqueur (Kahlúa) or dark rum mixed into the espresso
If you can’t find mascarpone locally, you can substitute with an equal weight of full-fat cream cheese blended with 2 tablespoons of heavy cream and 1 tablespoon of sour cream — though the authentic flavor difference is noticeable. We strongly recommend sourcing mascarpone for best results.

Step-by-Step Instructions
Follow these steps carefully for a tiramisu that sets perfectly every time. Total active time is about 25 minutes; the rest is hands-off chilling.
Step 1: Make the Mascarpone Cream
In a large mixing bowl, combine the room-temperature mascarpone, sugar, and vanilla extract. Beat with a hand mixer or sturdy whisk until smooth and the sugar begins to dissolve — about 1–2 minutes. Do not overwork the mascarpone or it can become grainy.
In a separate, chilled bowl, whip the cold heavy cream to stiff peaks using a hand mixer. This takes about 3–4 minutes on medium-high speed. The cream should hold its shape when you lift the beaters.
Gently fold the whipped cream into the mascarpone mixture using a rubber spatula, in three additions. Use wide, sweeping motions to keep the cream light and airy. The final filling should be thick, billowy, and hold soft peaks when scooped.
Step 2: Prepare the Espresso Soak
Brew a strong cup of espresso or very strong coffee — about 1½ cups total — and allow it to cool completely to room temperature. Hot espresso will dissolve the ladyfingers too quickly and result in a soggy mess. If you’re using the optional liqueur, stir it in now.
Pour the cooled espresso into a shallow bowl or wide dish that’s large enough to dip the ladyfingers flat. You’ll be doing a quick dip — 1 second per side — not soaking them through.

Step 3: Layer the Tiramisu
Working quickly, dip each ladyfinger into the espresso for about 1 second per side — just long enough to absorb a little coffee without becoming saturated. Arrange them in a single layer in the bottom of your 9×13-inch dish, breaking pieces as needed to fill gaps.
Spread half the mascarpone cream evenly over the first ladyfinger layer using an offset spatula or the back of a spoon. Make sure the cream reaches all the edges.
Repeat with a second layer of dipped ladyfingers, then top with the remaining mascarpone cream. Smooth the top as evenly as possible — this is the surface everyone will see when you serve it.
Step 4: Chill and Dust
Cover the dish tightly with plastic wrap and refrigerate for a minimum of 4 hours. Overnight (8–12 hours) is ideal — the flavors meld together beautifully and the structure becomes much firmer, making it easier to cut clean squares. This is the most important step for a perfect tiramisu: do not rush it.
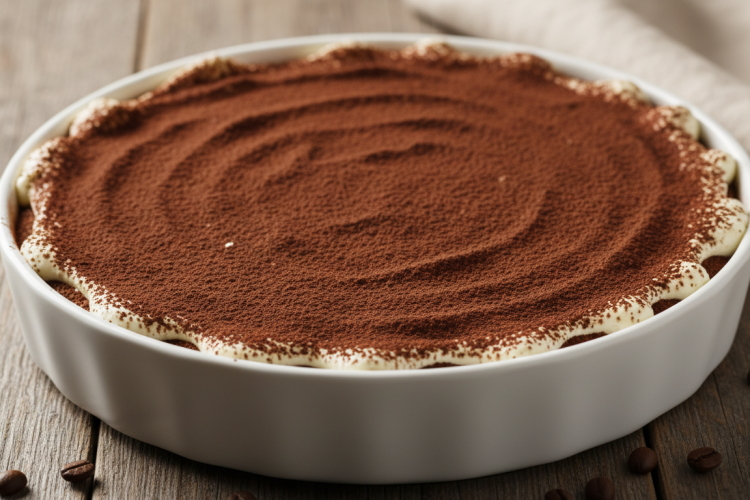
Just before serving, remove the plastic wrap and use a fine-mesh sieve to dust the entire top surface generously with unsweetened cocoa powder. This iconic dusting adds a slightly bitter contrast to the sweet cream and gives tiramisu its signature look. Serve immediately after dusting for the freshest presentation.

Tips for Perfect Tiramisu Every Time
Even simple recipes have pitfalls. These tried-and-tested tips will help you nail it on the first try:
- Don’t over-soak the ladyfingers. The single biggest mistake beginners make is soaking them too long. A quick 1-second dip per side is all you need. Over-soaked ladyfingers turn to mush and make the tiramisu collapse.
- Use cold heavy cream. Warm cream won’t whip properly. Chill your bowl and beaters in the freezer for 10 minutes before whipping for best results.
- Room-temperature mascarpone. Cold mascarpone tends to become lumpy. Pull it from the fridge 30 minutes before you start.
- Strong coffee matters. Weak coffee produces bland tiramisu. Use espresso if possible, or brew a double-strength pot of regular coffee. The more robust the coffee flavor, the better the final dessert.
- Chill time is non-negotiable. The dessert needs at least 4 hours to set. Rushing this step results in a runny tiramisu that won’t hold its shape when sliced.
- Dust just before serving. Cocoa absorbs moisture quickly in the fridge. If you dust and then chill again, the powder will darken and lose its visual appeal.
Variations and Flavor Twists
Once you’ve mastered the classic version, these popular variations are worth exploring:
Churro Tiramisu
Swap the ladyfingers for cinnamon-sugar churro bites soaked in a light coffee or dulce de leche dip, then layer with the same mascarpone cream. The result is a warm, spiced twist that’s become a popular fusion dessert — and a natural pairing for fans of our Easy Churro Tres Leches Cake.
Matcha Tiramisu
Replace the espresso soak with a sweetened matcha green tea solution (1 tbsp matcha whisked into 1½ cups hot water with 1 tbsp sugar, cooled). The earthy bitterness of matcha pairs wonderfully with the sweet mascarpone cream. Dust with matcha powder instead of cocoa for a striking green finish — a great companion to our Matcha Churros Recipe.
Strawberry Tiramisu
Use a light strawberry juice soak (blend 1 cup fresh strawberries with 2 tablespoons sugar, strain) instead of espresso. Fold thin sliced strawberries between layers. Skip the cocoa dusting and use powdered sugar or freeze-dried strawberry powder instead.
Individual Tiramisu Cups
Layer the tiramisu in individual wine glasses, mason jars, or dessert cups instead of a baking dish. This is perfect for dinner parties — no slicing required, and each guest gets their own perfectly portioned serving. Check out our Easy Flan Recipe for another elegant individual-serving dessert idea.

Make-Ahead and Storage
Tiramisu is one of the best make-ahead desserts — it actually improves after 12–24 hours in the fridge as the flavors deepen and the texture becomes more cohesive. Here’s how to plan ahead:
- Make up to 2 days ahead: Assemble the tiramisu without the cocoa dusting, cover tightly, and refrigerate. Dust just before serving.
- Refrigerator storage: Covered tiramisu keeps well in the fridge for up to 3 days. After that, the ladyfingers become overly soft and the cream starts to weep.
- Freezer storage: Yes, tiramisu freezes well! Wrap the dish tightly in plastic wrap and a layer of foil. Freeze for up to 1 month. Thaw overnight in the fridge. Note: the texture will be slightly softer after freezing, but still delicious.
- Serving size tip: A 9×13 dish yields 12–15 squares cut at roughly 3×3 inches. For a dinner party of 8, a 9×9 dish with proportionally reduced ingredients works perfectly.
Why This Recipe Works
Many tiramisu recipes online use raw egg yolks — a concern for pregnant women, the elderly, and anyone avoiding raw eggs. This recipe skips the egg yolks entirely, relying instead on whipped heavy cream to create the mousse-like texture that makes tiramisu so irresistible. The result is just as creamy and rich, and 100% safe for all guests.
The mascarpone-to-cream ratio is calibrated for a filling that’s thick enough to hold clean layers but light enough to melt on the tongue. Too much mascarpone and the filling becomes dense; too much cream and it won’t set properly. This balance is why this recipe works every single time — no guesswork required.
For more creamy no-bake dessert ideas, explore our Easy No-Bake Cheesecake — it uses a similar whipped mascarpone technique and comes together in under 20 minutes. And if you love coffee-flavored desserts, our Chocolate Lava Cake Recipe makes a stunning companion on the same dessert table.
Frequently Asked Questions
Can I make tiramisu without mascarpone?
Yes, though the flavor won’t be identical. The best substitute is a blend of full-fat cream cheese (softened), heavy cream, and a touch of sour cream. Use 8 oz cream cheese + 3 tbsp heavy cream + 1 tbsp sour cream to replace 8 oz mascarpone. The texture is slightly tangier and denser, but still very good.
Can I make tiramisu without eggs?
This recipe already skips the eggs entirely. Traditional Italian tiramisu uses raw egg yolks whipped with sugar, but this version achieves the same creamy, mousse-like texture using whipped heavy cream folded into mascarpone. No eggs, no safety concerns, no special technique needed.
Why is my tiramisu runny?
The most common causes are: (1) the cream wasn’t whipped to stiff peaks before folding, (2) the mascarpone was overworked and became grainy/liquid, or (3) it wasn’t chilled long enough. Make sure to chill for at least 4 hours — overnight is strongly recommended for a firm, sliceable tiramisu. See Serious Eats’ guide to tiramisu for a deeper look at the science behind the setting process.
Can I use regular coffee instead of espresso?
Absolutely. Brew your coffee at double or triple strength — about 2 tablespoons of ground coffee per 6 oz of water. The key is depth of flavor; weak coffee produces bland tiramisu. Instant espresso powder dissolved in hot water also works well in a pinch.
How long does tiramisu last in the fridge?
Properly covered tiramisu keeps well in the refrigerator for up to 3 days. After that the ladyfingers become too soft and the cream starts to separate. For longer storage, freeze it (see Make-Ahead section above). Always dust with fresh cocoa just before serving, not before refrigerating.