
Easy panna cotta is an Italian cream dessert made from just 5 ingredients — heavy cream, sugar, gelatin, vanilla, and milk — that sets to a silky, wobbly perfection in the refrigerator overnight. It requires no baking, no special equipment, and less than 15 minutes of hands-on time, making it one of the most impressive yet effortless desserts you can make at home.

What Is Panna Cotta?
Panna cotta (pronounced PAH-nah KOH-tah) literally means “cooked cream” in Italian. It originates from the Piedmont region of northern Italy and has been a staple of Italian dessert menus since at least the early 20th century. At its core, it is simply sweetened cream that has been gently heated, infused with vanilla, and set with a small amount of gelatin.
The result is a dessert with an extraordinarily silky texture — firmer than a mousse but softer and creamier than a traditional gelatin dessert. When done correctly, a panna cotta holds its shape when unmolded yet quivers and jiggles in a way that signals perfect, delicate texture. It is typically served chilled, unmolded onto a plate or presented in the cup it set in, with a sauce or fresh fruit alongside.
Unlike many Italian desserts that require technical pastry skills, panna cotta is genuinely one of the most forgiving recipes in existence. The ratio of gelatin to liquid determines the final texture — and once you understand that ratio, you can customize the recipe endlessly. According to Serious Eats, the ideal gelatin ratio for a free-standing yet jiggly panna cotta is approximately 1 teaspoon of powdered gelatin per 2 cups of cream.
Panna Cotta Recipe
Ingredients (Serves 6)
- 2½ cups (600ml) heavy whipping cream
- ½ cup (120ml) whole milk
- ⅓ cup (65g) granulated sugar
- 2¼ teaspoons (1 packet / 7g) unflavored powdered gelatin
- 3 tablespoons cold water (for blooming gelatin)
- 1 teaspoon pure vanilla extract (or 1 vanilla bean, scraped)
- Pinch of salt
Equipment
- 6 small ramekins, glasses, or cups (approximately ¾ cup / 180ml capacity each)
- Medium saucepan
- Small bowl
- Whisk
- Fine mesh strainer (optional but recommended)
- Ladle or liquid measuring cup for pouring
Instructions
Step 1: Bloom the Gelatin
Pour 3 tablespoons of cold water into a small bowl. Sprinkle the powdered gelatin evenly over the surface. Do not stir. Let it sit undisturbed for 5 minutes — the gelatin granules will absorb the water, swell, and become translucent. This blooming step is crucial: gelatin that hasn’t fully bloomed won’t dissolve evenly in your cream, leaving lumps or uneven setting.

Step 2: Heat the Cream
Combine the heavy cream, whole milk, granulated sugar, and a pinch of salt in a medium saucepan over medium heat. Whisk gently to dissolve the sugar as the mixture warms. Heat until the cream is steaming and just beginning to simmer around the edges — you’ll see small bubbles forming at the perimeter of the pan. Do not bring it to a full boil; boiling cream can affect the final texture and may cause the milk proteins to separate.
If using a vanilla bean instead of extract: split the bean lengthwise, scrape out the seeds with the back of a knife, and add both the seeds and the pod to the cream mixture. Allow it to steep for 5–10 minutes off the heat before proceeding. Remove the pod before adding the gelatin.

Step 3: Add the Gelatin
Remove the hot cream mixture from the heat. Add the bloomed gelatin to the warm cream and whisk vigorously until completely dissolved — about 1–2 minutes of steady whisking. There should be no visible gelatin clumps. Add the vanilla extract (if using extract instead of vanilla bean) and stir to combine.
At this stage, if you want an especially smooth result, strain the mixture through a fine mesh strainer into a large measuring cup or pitcher with a pour spout. This removes any undissolved gelatin specks and the vanilla bean seeds if you prefer a cleaner appearance (though many people enjoy seeing the vanilla specks — it signals real vanilla).
Step 4: Pour Into Molds
Lightly spray or brush the inside of your ramekins or glasses with a neutral oil (such as vegetable or canola) if you plan to unmold the panna cottas. If serving in the glass, you can skip this step entirely.
Pour the cream mixture evenly into the prepared cups. Each cup should be about ¾ full. Allow the filled cups to cool at room temperature for 20–30 minutes before moving them to the refrigerator — this prevents condensation on the surface and helps them set more evenly.

Step 5: Refrigerate Until Set
Cover each cup loosely with plastic wrap (pressed gently against the surface to prevent a skin forming) and refrigerate for a minimum of 4 hours. Overnight refrigeration — 8 to 12 hours — produces the best, most evenly set result. Don’t rush this step; under-set panna cotta will collapse when unmolded.
To test if the panna cotta is set, gently nudge a cup. A properly set panna cotta will wobble as a cohesive unit, like a very firm jelly. If it ripples in the middle or looks liquid at the center, return it to the refrigerator for another 2 hours.
Step 6: Unmold (Optional) and Serve
To unmold: run a thin knife or offset spatula around the edge of the panna cotta, pressing gently against the mold wall (not into the panna cotta itself). Place a dessert plate upside down on top of the cup, then flip both together in one confident motion. Give the cup a gentle shake if needed, then lift it off. The panna cotta should release cleanly onto the plate.
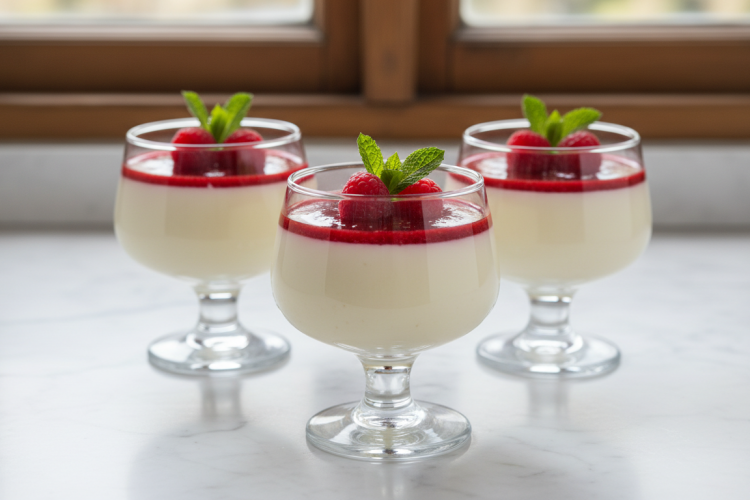
If serving in cups, skip the unmolding step entirely and simply add your chosen topping directly to the surface of the set panna cotta.

Panna Cotta Toppings: 6 Best Options
The beauty of panna cotta is its neutrality — the vanilla cream base pairs with almost any sauce or fruit topping. Here are the best options, ranked from most classic to most creative:
- Raspberry coulis — The most classic pairing. Blend 1 cup fresh or frozen raspberries with 2 tablespoons sugar and 1 tablespoon lemon juice, then strain to remove seeds. The tartness cuts beautifully through the rich cream.
- Strawberry sauce — Simmer halved strawberries with sugar until jammy. Spoon warm over cold panna cotta for a beautiful temperature contrast.
- Mango coulis — Blend ripe mango with a squeeze of lime and a pinch of chili powder for a tropical-inspired topping with a subtle kick.
- Salted caramel — A drizzle of salted caramel sauce over a vanilla panna cotta is an indulgent, crowd-pleasing combination. The salt accentuates the cream’s sweetness.
- Espresso syrup — Reduce 1 cup strong espresso with 2 tablespoons sugar to a thin syrup. The bitterness of coffee against the sweet cream is a sophisticated adult pairing.
- Fresh fruit and honey — The simplest option: arrange seasonal berries, sliced figs, or citrus segments over the panna cotta and drizzle with wildflower honey.

Panna Cotta Variations
Once you master the base recipe, the possibilities expand significantly. Here are the most popular panna cotta variations:
Chocolate Panna Cotta
Add 3 ounces (85g) of finely chopped dark chocolate or high-quality dark cocoa to the hot cream mixture after removing from heat. Whisk until completely melted and smooth before adding the bloomed gelatin. The result is a deeply chocolatey, dense, fudge-like panna cotta that pairs perfectly with a raspberry coulis. For a similar rich chocolate dessert experience, our no-bake chocolate cheesecake uses a comparable no-bake technique with spectacular results.
Matcha Panna Cotta
Whisk 1–2 teaspoons of ceremonial-grade matcha powder with 2 tablespoons of the warm cream (to form a paste) before adding it to the rest of the cream mixture. This prevents clumping and gives a smooth, vivid green panna cotta with an earthy, slightly bitter flavor that pairs beautifully with sweet red bean paste or a honey drizzle.
Coconut Panna Cotta (Dairy-Free)
Replace the heavy cream and milk entirely with 2 cans (800ml total) of full-fat coconut milk. The natural fat content of coconut milk is sufficient to create a creamy, well-set panna cotta with a distinct coconut flavor. This version is also naturally dairy-free, making it suitable for lactose-intolerant guests. Top with fresh mango and toasted coconut flakes for a tropical dessert.
Coffee Panna Cotta
Steep 2 tablespoons of coarsely ground espresso or instant espresso powder in the hot cream for 10 minutes, then strain before adding the gelatin. This creates a coffee panna cotta with the same depth of flavor as a great tiramisu. Serve alongside our classic tiramisu recipe for a fully Italian dessert spread.
Honey Lavender Panna Cotta
Replace the granulated sugar with 3 tablespoons of good-quality honey, and steep 1 tablespoon of dried culinary lavender in the hot cream for 10 minutes before straining. The result is a floral, delicately perfumed panna cotta that looks and tastes like something from a high-end restaurant. Garnish with a few fresh lavender sprigs and a thin drizzle of extra honey.
Troubleshooting: Why Didn’t My Panna Cotta Set?
Panna cotta failure almost always comes down to one of three issues:
- Gelatin didn’t fully dissolve — If you added the bloomed gelatin to cream that was too cool (below 140°F/60°C), it won’t dissolve completely. Always ensure the cream is hot and steaming before adding the gelatin, and whisk for at least 2 full minutes.
- Not enough gelatin — Using less than the recipe calls for will result in a panna cotta that doesn’t hold its shape when unmolded. Measure precisely — gelatin is not forgiving of approximation.
- Not enough chilling time — Panna cotta that has only been refrigerated for 2 hours may look set on top but still be liquid in the center. Always chill for a minimum of 4 hours; overnight is even better.
If your panna cotta didn’t set and you notice the problem before adding toppings, you can re-melt it gently: place the cups in a warm water bath until the panna cotta liquefies, bloom an additional ¼ teaspoon gelatin in 1 tablespoon cold water, dissolve it into the warm mixture, re-pour into cups, and refrigerate again. It won’t be quite as silky as the original, but it will set properly.
Make-Ahead and Storage Tips
Panna cotta is one of the best make-ahead desserts in any recipe collection. The set, covered panna cottas keep beautifully in the refrigerator for up to 3 days without any quality degradation. This makes them ideal for dinner parties — prepare them two days in advance and simply add the topping just before serving.
Can you freeze panna cotta? Technically yes, but not recommended. Freezing causes the gelatin matrix to weaken and the cream to separate slightly on thawing, resulting in a grainy or watery texture. If you need a longer make-ahead option, consider a chocolate mousse or vanilla cheesecake which freeze better.
Storage: Keep panna cottas covered with plastic wrap pressed directly against the surface, or use cups with lids. They will absorb refrigerator odors if left uncovered.
Serving Panna Cotta at a Party
Panna cotta is one of the most party-friendly desserts because it requires zero last-minute effort. Prepare it entirely the day before, keep it refrigerated in serving cups, and set out a topping “bar” at dessert time — a bowl of berry coulis, a jar of caramel sauce, and a plate of fresh fruit — and let guests customize their own. This presentation feels effortlessly sophisticated and requires no plating skills from the host.
For a cohesive Italian dessert spread, pair panna cotta with our easy tiramisu recipe and a plate of biscotti for a restaurant-quality experience at home. Alternatively, build a no-bake dessert table by adding our no-bake chocolate cheesecake and chocolate mousse cups — all three set in the refrigerator with minimal active cooking.
Frequently Asked Questions
How long does panna cotta take to set?
Panna cotta needs a minimum of 4 hours in the refrigerator to set fully. For best results and a consistently firm, jiggly texture, refrigerate overnight — 8 to 12 hours. Rushing the setting time is the most common cause of panna cotta that collapses when unmolded. You can speed things up very slightly by placing the cups in the freezer for 30 minutes before transferring to the refrigerator, but the full refrigerator time is still necessary.
Can I make panna cotta without gelatin?
Yes — agar-agar is the most common substitute. Use approximately 1 teaspoon of agar-agar powder in place of the 2¼ teaspoons of gelatin in this recipe. Agar-agar must be boiled (not just heated) to activate, so bring the cream mixture to a full boil briefly after adding it. Agar-agar sets firmer and faster than gelatin and does not require refrigeration to set (it gels at room temperature), and it produces a slightly different, more firm texture. It is also plant-based, making agar panna cotta vegan-friendly.
Why is my panna cotta rubbery?
A rubbery panna cotta is almost always the result of too much gelatin. The ratio matters enormously: for a delicate, jiggly set, use no more than 1 teaspoon (2.3g) of gelatin per cup of liquid. If you scaled up the recipe and used more gelatin than needed proportionally, the result will be dense and bouncy rather than silky and yielding. Next time, measure by weight rather than volume for the most precise result.
Is panna cotta gluten free?
Yes — classic panna cotta is naturally gluten free. None of the core ingredients (cream, milk, sugar, gelatin, vanilla) contain gluten. Just be cautious with flavored add-ins: some coffee liqueurs or specialty flavorings may contain gluten-containing additives. Always check labels on any flavoring agents you add to ensure the final dessert remains gluten free. For more on navigating gluten in sweet treats, see our full guide to gluten-free chocolate candies.
What is the difference between panna cotta and crème brûlée?
Both are classic European cream-based desserts, but they differ fundamentally in preparation and texture. Crème brûlée is a baked custard — the cream is thickened with egg yolks and set in a water bath in the oven, then finished with a caramelized sugar crust. Panna cotta is set with gelatin and requires no baking. Texture-wise, crème brûlée is denser and more eggy, while panna cotta is lighter, silkier, and cleaner in flavor. Panna cotta is also significantly easier to make and more forgiving for beginners.