

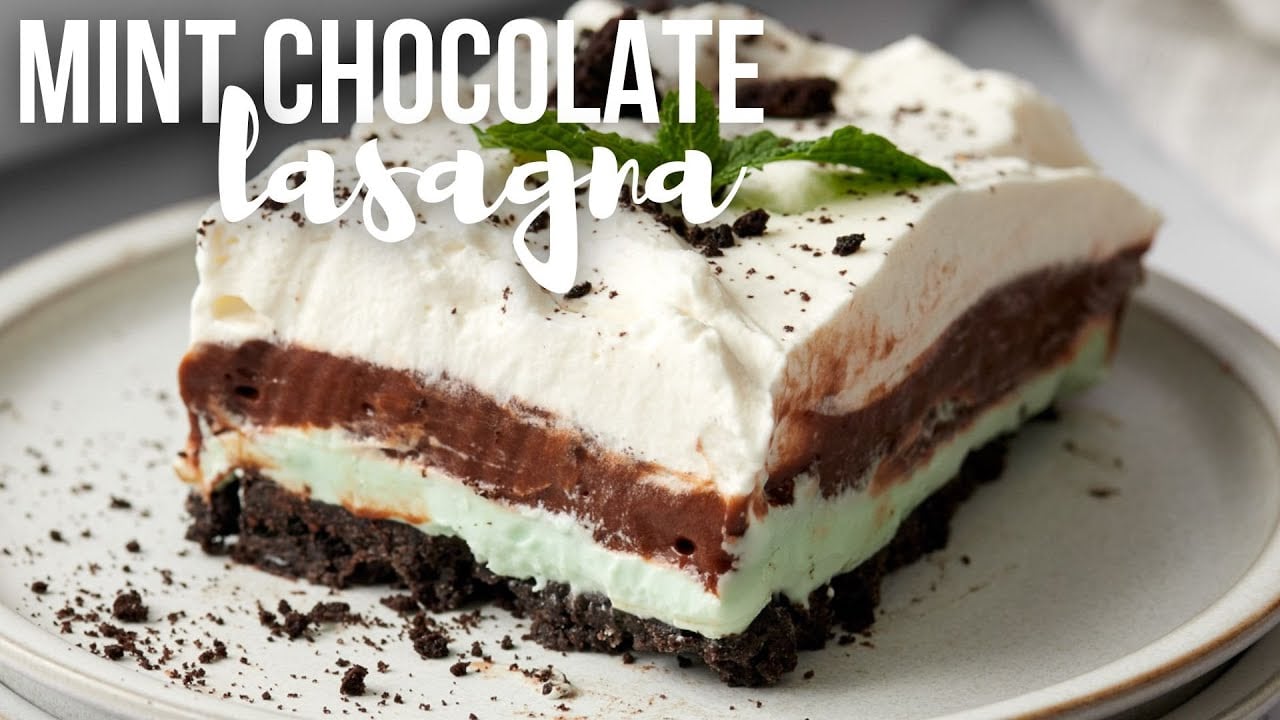
Okay, let’s be real – sometimes you just need dessert, but the thought of turning on the oven is a hard no, right? Especially when it’s hot, or you’re just plain tired. That’s where this No-Bake Mint Chocolate Lasagna Recipe comes in like a superhero. Seriously, it’s the easiest way to get a totally impressive dessert on the table, no baking required. Whether you’re having people over or just want a treat for yourself, this is your secret weapon for instant dessert satisfaction.
Now, picture this: a crunchy, chocolatey Oreo crust (because who doesn’t love Oreos?), then this dreamy, cool minty layer, and then… rich chocolate pudding, all stacked together. Yeah, it’s as good as it sounds. Actually, it’s even better. This No-Bake Mint Chocolate Lasagna Recipe is all about those crave-able textures and flavors that just work perfectly together. It’s that kind of dessert that everyone, from picky kids to dessert snobs, just loves. Trust me on this one.
So, are you in? Because honestly, making this No-Bake Mint Chocolate Lasagna Recipe is almost as fun as eating it. The steps are crazy simple – you’re basically just layering deliciousness. And the end result? A mint chocolate lasagna that’s both totally decadent and somehow still refreshing at the same time. Ready to get started? Let’s make some no-bake dessert magic happen!

No-Bake Mint Chocolate Lasagna
Equipment
- 9×13-inch baking dish for assembling layers
- Spatula for spreading layers
- Food processor for crushing Oreos
- Refrigerator for chilling dessert
Ingredients
- 36 pieces Oreo cookies crushed, for the crust
- 6 tbsp unsalted butter melted
- 8 oz cream cheese softened
- 1 cup powdered sugar
- 1 tsp mint extract
- 1 cup whipped topping thawed, such as Cool Whip
- 1 box chocolate instant pudding mix (3.9 oz)
- 2 cups cold milk
- 1.5 cups mini chocolate chips for topping
- 1 cup whipped topping additional for topping
- 1 drop green food coloring optional, for mint layer
Instructions
- In a food processor, crush Oreo cookies into fine crumbs. Mix with melted butter until well combined. Press the mixture firmly into the bottom of a 9×13 inch baking dish to form a crust.
- In a mixing bowl, beat softened cream cheese, powdered sugar, and mint extract until smooth. Fold in 1 cup of whipped topping and a drop of green food coloring (optional). Spread this mixture evenly over the crust.
- Whisk together chocolate pudding mix and cold milk until thickened. Spread over the mint layer.
- Spread the remaining whipped topping evenly over the chocolate pudding layer.
- Refrigerate for at least 3-4 hours to allow the layers to set.
- Before serving, sprinkle with mini chocolate chips and slice into squares. Enjoy!
Notes
- Optional Equipment: An offset spatula can help with spreading layers evenly.
- Customization: Use white chocolate pudding or add crushed peppermint candies for a festive twist.
- Storage: Store in the refrigerator for up to 3 days. Keep covered to maintain freshness.
- Serving Tip: For cleaner slices, freeze for 30 minutes before cutting.
Nutrition
Introduction to a Mint-Chocolate Masterpiece
Ever wondered what makes a dessert unforgettable? This layered treat combines cool mint and rich chocolate in a way that’s both refreshing and indulgent. It’s not just a dessert—it’s a celebration on a plate.
What Makes This Dessert Special
The fusion of mint and chocolate is a cultural treat, especially during holidays like St. Patrick’s Day. Its vibrant green layer and layered textures make it a standout centerpiece. Whether it’s a festive gathering or a casual day, this dessert always steals the show.
The Story Behind the Recipe
This recipe draws inspiration from holiday traditions, blending classic flavors with modern trends. It’s a favorite among urban foodies who appreciate its effortless elegance. For more creative takes on mint chocolate desserts, explore these irresistible ideas.
| Feature | Why It Stands Out |
|---|---|
| Flavor Fusion | Cool mint meets rich chocolate for a refreshing taste. |
| Festive Appeal | Perfect for holidays like St. Patrick’s Day and Christmas. |
| Texture Layers | Crunchy crust, creamy filling, and smooth pudding. |
Key Ingredients for a No-Bake Delight
What’s the secret behind a dessert that’s both creamy and crunchy? It’s all in the ingredients. Every component plays a crucial role in creating the perfect balance of flavors and textures. Let’s break down the essentials that make this treat unforgettable.
Essential Components of a Layered Dessert
At the heart of this dessert is cream cheese. Its ultra-creamy texture binds the layers together, adding richness and depth. Brands like Philadelphia work wonders, but any high-quality cream cheese will do the trick.
Next up is chocolate pudding. This layer brings a smooth, velvety consistency that contrasts beautifully with the crunchy base. Using instant pudding mix ensures quick preparation without compromising on taste.
Understanding the Role of Each Ingredient
The oreo cookie crust is the foundation. Crushed cookies mixed with melted butter create a base that’s both sturdy and flavorful. It’s the crunch that sets the stage for the creamy layers above.
Milk is the unsung hero. It’s essential for preparing the pudding, ensuring it’s thick but not overly dense. Whole milk works best, but you can substitute with almond or oat milk for a lighter version.
Quality matters. Fresh ingredients and the right proportions ensure every bite is a harmonious blend of flavors. For more inspiration on layering desserts, check out this chocolate tiramisu recipe.
Preparing the Oreo Cookie Crust
The foundation of any great dessert starts with a solid base. For this treat, the oreo cookie crust is the star. It’s crunchy, flavorful, and holds everything together. Let’s break down how to get it just right.
Crushing Cookies to Perfection
Start with 32 mint-flavored Oreo cookies. Use a food processor for a fine, even crumb. If you don’t have one, place the cookies in a zip-top bag and crush them with a rolling pin. The goal is a consistent texture—no large chunks.
Mixing with Melted Butter
Next, melt 6 tablespoons of butter. Pour it over the crushed cookies and mix thoroughly. The butter binds the crumbs, creating a sturdy base. Press the mixture firmly into your pan. Use the back of a spoon or a measuring cup to ensure it’s evenly distributed.
A well-prepared oreo cookie crust is the backbone of this dessert. Take your time here—it’s worth it. Once done, set it aside while you prepare the next layer.
Crafting the Mint Cream Cheese Filling
Ready to elevate your dessert game with a creamy, mint-infused layer? This filling is the star of the show, combining smooth texture with a refreshing kick. Let’s break it down step by step.
Achieving a Smooth Texture
Start with 8 ounces of softened cream cheese. Beat it until it’s perfectly smooth—no lumps allowed. Add ¼ cup of granulated sugar and mix until fully incorporated. The result? A velvety base that’s rich and indulgent.
Next, fold in 1 cup of whipped topping. This adds a light, airy finish to the cream cheese layer. For extra creaminess, use a hand mixer on low speed. The goal is a filling that’s lush and spreadable.
Boosting the Mint Flavor
To infuse that refreshing mint taste, add 1 teaspoon of mint extract. Mix thoroughly, ensuring the flavor is evenly distributed. For a vibrant green hue, a drop of food coloring works wonders. Just remember: balance is key. Too much mint can overpower the dessert’s richness.
Here’s a pro tip: taste as you go. Adjust the extract or sugar to suit your preference. The perfect mint cream cheese filling should be refreshing, not overwhelming.
| Step | Key Tip |
|---|---|
| Beat Cream Cheese | Ensure it’s lump-free for a smooth texture. |
| Add Sugar | Mix until fully dissolved for sweetness. |
| Fold in Whipped Topping | Creates a light, airy finish. |
| Incorporate Mint Extract | Add gradually to avoid overpowering the flavor. |
With these steps, you’ll create a cream cheese layer that’s both luxurious and refreshing. It’s the perfect centerpiece for your dessert masterpiece.
Creating the Chocolate Pudding Layer
Achieving the perfect pudding layer is easier than you think. Here’s the scoop. This layer is the heart of the dessert, balancing the tangy mint cream with deep, rich flavors. Let’s break it down step by step.
Mixing Instant Pudding with Milk
Start with two small boxes of instant chocolate pudding mix. Pour them into a large bowl and add 2 ¾ cups of cold milk. Whisk vigorously for about 2 minutes. The key here is to work quickly to avoid lumps and achieve a smooth, thick consistency.
Once mixed, let the chocolate pudding rest for 5 minutes. This allows it to set and thicken further. The result? A velvety layer that’s both indulgent and perfectly balanced.
Tips for the Perfect Thickness
To ensure your pudding layer is just right, follow these simple tips:
- Use cold milk. It helps the pudding mix set faster and creates a thicker texture.
- Whisk vigorously. This prevents lumps and ensures a creamy finish.
- Let it chill. After mixing, refrigerate the pudding for at least 15 minutes before layering. This enhances its thickness and flavor.
For an extra touch of luxury, fold in a cup of whipped topping into the pudding. This adds a light, airy texture that complements the richness of the chocolate.
With these steps, you’ll create a chocolate pudding layer that’s smooth, thick, and utterly irresistible. It’s the perfect complement to the mint cream, making every bite a harmonious blend of flavors.
Assembling the Layers Step-by-Step
Want to master the art of layering desserts like a pro? It’s all about precision, patience, and a little creativity. This guide will walk you through the process of building a dessert that’s as visually stunning as it is delicious.
Layering Order and Techniques
Start with the Oreo cookie crust. Spread it evenly across the pan, pressing firmly to create a sturdy base. This crunchy layer sets the stage for the creamy textures above.
Next, add the mint cream cheese filling. Use a spatula to spread it smoothly, ensuring an even thickness. This layer brings a refreshing contrast to the rich flavors.
Top it off with the chocolate pudding mix. Pour it gently over the cream cheese layer, allowing it to settle naturally. This final touch adds a velvety finish to the dessert.

| Layer | Key Tip |
|---|---|
| Oreo Crust | Press firmly for a sturdy base. |
| Mint Cream | Spread evenly for a smooth texture. |
| Chocolate Pudding | Pour gently to avoid mixing layers. |
| Whipped Topping | Add just before serving for freshness. |
Chill the dessert for at least 2 hours before serving. This allows the layers to set, ensuring every bite is a perfect blend of textures and flavors. With these steps, you’ll create a dessert lasagna that’s as impressive as it is indulgent.
Best No-Bake Mint Chocolate Lasagna Recipe
Craving a dessert that’s both refreshing and indulgent? This layered treat is your answer. With no oven required, it’s a breeze to prepare and perfect for any occasion. Follow these detailed steps to create a dessert that’s as stunning as it is delicious.
Detailed Preparation Instructions
Start by crushing 36 Oreo cookies into fine crumbs. Mix them with 6 tablespoons of melted butter and press firmly into a 9×13-inch pan. Chill for 5 minutes to set the crust.
For the mint layer, beat 8 ounces of cream cheese until smooth. Add 1 cup of powdered sugar, 1 teaspoon of mint extract, and 1 cup of whipped topping. Spread this mixture evenly over the crust and refrigerate for 10 minutes.
Next, prepare the chocolate layer. Whisk 2 packages of instant pudding mix with 3 cups of cold milk until thick. Let it rest for 5 minutes, then pour it over the mint layer. Chill for another 10 minutes.
Finally, top with 8 ounces of whipped topping and garnish with Andes mint chocolate chips. Refrigerate for at least 4 hours before serving. This ensures the layers set perfectly.
| Step | Key Tip |
|---|---|
| Crush Oreos | Use a food processor for even crumbs. |
| Mix with Butter | Press firmly for a sturdy base. |
| Beat Cream Cheese | Ensure it’s lump-free for a smooth texture. |
| Whisk Pudding | Use cold milk for the perfect thickness. |
“The key to this dessert is patience. Let each layer set before adding the next for the best results.”
For more creative dessert ideas, check out this chocolate chip cookie recipe. It’s another crowd-pleaser that’s easy to make and always a hit.
Tips and Variations for a Custom Twist
Ready to add your own flair to this crowd-pleasing dessert? Whether you’re celebrating St. Patrick’s Day or just want to experiment, these tips will help you make it uniquely yours.
Flavor Substitutions and Enhancements
Swap mint extract for peppermint if you prefer a bolder flavor. For a festive vibe, add a few drops of green food coloring to the cream cheese layer. It’s perfect for Patrick Day celebrations or any holiday gathering.
Adjust the sweetness by tweaking the amount of powdered sugar. Add it to the cream cheese layer for a richer taste or sprinkle it on top for a decorative finish. For a lighter version, use almond or oat milk in the pudding mix.
- Use different cookie types for the crust, like graham crackers or chocolate wafers.
- Add a layer of caramel or fudge sauce for extra indulgence.
- Top with crushed candy canes for a holiday twist.
For more inspiration on customizing desserts, check out these must-try cookie trends. They’re packed with innovative ideas to elevate your baking game.
Whether it’s for St. Patrick’s Day or a casual get-together, these variations ensure your dessert stands out. Experiment, have fun, and make it your own!
Decorating and Garnishing Your Dessert
Transform your dessert into a visual masterpiece with creative garnishes. The right toppings can elevate your dish from delicious to Instagram-worthy. Whether you’re aiming for classic elegance or modern flair, these tips will help you nail the presentation.

Topping Ideas: Whipped Cream, Mints, and More
Start with a generous layer of whipped topping. It adds a light, airy finish that contrasts beautifully with the rich layers below. For a homemade touch, whip heavy cream with a hint of sugar until stiff peaks form. It’s fresher and more customizable than store-bought versions.
Add a pop of color and flavor with mint leaves. They’re not just decorative—they enhance the dessert’s refreshing taste. Scatter a few leaves on top or arrange them in a pattern for a polished look.
Crushed oreo pieces are another great option. They bring a satisfying crunch and tie the dessert’s flavors together. Sprinkle them evenly or create a border for a structured design.
For a touch of luxury, try chocolate curls. Use a vegetable peeler to shave a bar of dark or milk chocolate. The delicate curls add texture and a decadent finish.
| Topping | Effect |
|---|---|
| Whipped Topping | Adds lightness and smoothness. |
| Mint Leaves | Enhances freshness and visual appeal. |
| Crushed Oreo | Provides crunch and flavor contrast. |
| Chocolate Curls | Adds elegance and richness. |
Timing is key. Add your garnishes just before serving to keep them fresh and vibrant. A sprinkle of green sprinkles or a drizzle of chocolate syrup can make all the difference. For more inspiration, check out these trendy dessert ideas.
Storage, Make-Ahead, and Serving Suggestions
Want to keep your dessert fresh and stylish? Here’s how. Proper storage and presentation are key to maintaining its flavor and texture. Whether you’re preparing it ahead of time or serving it immediately, these tips ensure your dessert stays as impressive as the first bite.
Chilling and Refrigeration Best Practices
Chilling is essential for this dessert. After assembling, refrigerate it for at least 6 hours or overnight. This allows the layers to set and meld together perfectly. For best results, cover it with plastic wrap to prevent drying out.
If you’re making it ahead of time, it can stay fresh in the fridge for up to 3-4 days. Just ensure it’s stored in an airtight container. This makes it a convenient option for busy schedules or last-minute gatherings.
Presentation and Serving Tips
When it’s time to serve, let the dessert sit at room temperature for about 10 minutes. This softens the layers slightly, making it easier to slice. Use a sharp knife dipped in warm water for clean, even cuts.
For a stylish presentation, add a dollop of whipped topping or a sprinkle of crushed cookies. A drizzle of chocolate syrup or a few fresh mint leaves can elevate the look. Serve in individual cup-sized portions for a polished finish.
- Chill for at least 6 hours before serving.
- Store in an airtight container for up to 3-4 days.
- Let it sit for 10 minutes before slicing.
- Garnish with whipped topping or chocolate drizzle.
| Step | Key Tip |
|---|---|
| Chilling | Refrigerate for at least 6 hours. |
| Storage | Use an airtight container. |
| Serving | Let it sit for 10 minutes before slicing. |
| Garnishing | Add whipped topping or chocolate drizzle. |
For more make-ahead dessert ideas, check out this pistachio tiramisu recipe. It’s another no-bake treat that’s perfect for any occasion.
Nutritional Information and Ingredient Substitutions
Curious about the nutritional impact of your favorite dessert? Understanding the calorie breakdown and exploring ingredient swaps can help you enjoy this treat while staying mindful of your health goals. Let’s dive into the details.
Calorie Breakdown and Nutritional Facts
Each serving of this layered dessert packs a flavorful punch, but it’s essential to know what you’re consuming. Here’s a quick breakdown:
| Component | Calories | Fat (g) |
|---|---|---|
| Oreo Crust | 150 | 8 |
| Cream Cheese Layer | 120 | 6 |
| Chocolate Pudding | 100 | 4 |
| Whipped Topping | 50 | 3 |
These values are approximate and can vary based on specific brands and portion sizes. For a lighter version, consider using low-fat cream cheese or swapping whole milk for almond milk.
Ingredient Substitutions for Health-Conscious Choices
Want to make this dessert healthier without sacrificing taste? Here are some smart swaps:
- Cream Cheese: Opt for low-fat or non-dairy alternatives like cashew or almond-based cheese.
- Butter: Use coconut oil or a plant-based spread for a lighter crust.
- Whipped Topping: Replace with homemade whipped cream using heavy cream and a touch of vanilla extract.
- Pudding Mix: Choose sugar-free or low-calorie options to reduce overall sugar content.
These substitutions can significantly lower the calorie count while maintaining the dessert’s delicious texture and flavor. For more ideas on healthier dessert options, check out these no-bake chocolate treats.
Whether you’re counting calories or exploring dietary alternatives, these tips ensure you can enjoy this dessert guilt-free. Experiment with different ingredients to find the perfect balance of flavor and nutrition.
Conclusion
This layered treat is more than just a dessert—it’s a celebration of flavors and textures. From the crunchy oreo cookie crust to the velvety chocolate pudding, every bite is a harmonious blend of indulgence and refreshment. Perfect for St. Patrick’s Day or any festive occasion, it’s a crowd-pleaser that’s as easy to make as it is to enjoy.
Feel free to experiment with the recipe. Swap the cream cheese layer for a lighter alternative or add a drizzle of caramel for extra decadence. The possibilities are endless, making it a versatile choice for any gathering.
Whether you’re hosting a holiday party or treating yourself, this dessert is designed to impress. Share your creations and celebrate the joy of food as both art and indulgence. For another delightful recipe, try this pistachio raspberry cake—it’s equally effortless and delicious.
FAQ
What makes this dessert unique?
This treat combines the rich flavors of Oreo cookies, cream cheese, and chocolate pudding with a refreshing hint of mint. The layers create a visually stunning and deliciously balanced dessert perfect for any occasion.
Can I make this ahead of time?
Absolutely! This dessert is ideal for prepping in advance. Simply assemble it, refrigerate for at least 4 hours, and it’s ready to serve when needed.
Can I substitute ingredients for dietary needs?
Yes! Use gluten-free Oreos for a gluten-free version or sugar-free pudding mix for a lower-calorie option. Dairy-free alternatives like almond milk and vegan cream cheese also work well.
How do I achieve the perfect mint flavor?
Add a few drops of mint extract to the cream cheese layer and adjust to taste. For a bolder flavor, mix in crushed mint candies or use mint chocolate chips.
What’s the best way to store leftovers?
Keep it covered in the refrigerator for up to 3 days. Ensure it’s tightly sealed to maintain freshness and prevent the layers from drying out.
Can I freeze this dessert?
Freezing isn’t recommended as it can alter the texture of the layers. Stick to refrigeration for the best results.
How can I make this dessert festive for St. Patrick’s Day?
Add green food coloring to the cream cheese layer for a vibrant touch. Top with green sprinkles or mint candies to enhance the theme.
What’s the secret to a smooth pudding layer?
Whisk the instant pudding mix with cold milk until fully dissolved. Let it sit for a few minutes to thicken before spreading it over the layers.
Can I use homemade whipped cream instead of store-bought?
Definitely! Homemade whipped cream adds a fresh, creamy texture. Just ensure it’s stiff enough to hold its shape when layered.
How do I prevent the crust from getting soggy?
Press the Oreo crumb mixture firmly into the pan and let it set in the fridge before adding the next layer. This creates a sturdy base that holds up well.