
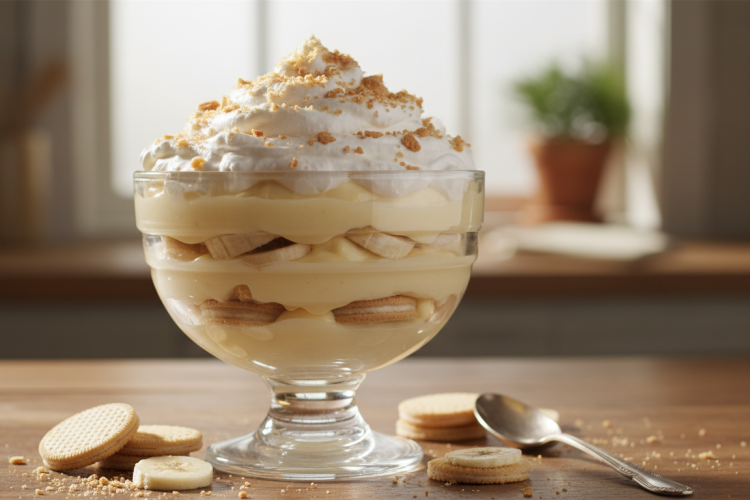
Banana pudding is a creamy, layered Southern dessert made with homemade vanilla custard, fresh banana slices, crisp vanilla wafers, and pillowy whipped cream. This from-scratch version takes about 30 minutes and delivers a rich, old-fashioned flavor that no boxed mix can match.
Why This Banana Pudding Recipe Works
Most banana pudding recipes reach for instant pudding mix and cool whip and call it a day. There’s nothing wrong with that shortcut — but if you’ve ever had the real thing, the kind made with a proper cooked vanilla custard, you know it hits differently. The custard is richer, silkier, and clings to every wafer and banana slice in a way that boxed mix never manages.
This recipe uses a classic Southern approach: a stovetop custard cooked from egg yolks, whole milk, sugar, cornstarch, and butter, then layered with Nilla wafers and ripe banana slices while still warm so everything softens together into one cohesive, dreamy dessert. It’s chilled overnight (or for at least 4 hours) before serving, and finished with a generous cloud of whipped cream.
If you love creamy layered desserts, you’ll also want to try our classic vanilla cheesecake and our easy chocolate mousse — both use a similar patient, from-scratch philosophy.

Ingredients You’ll Need
One of the best things about banana pudding is how humble the ingredient list is. You likely have most of this in your kitchen right now.
For the Vanilla Custard
- 4 large egg yolks
- ¾ cup (150g) granulated sugar
- ¼ cup (30g) cornstarch
- ¼ teaspoon fine salt
- 3 cups (720ml) whole milk
- 2 tablespoons (28g) unsalted butter
- 2 teaspoons pure vanilla extract
For the Layers
- 1 box (11 oz / 312g) Nilla Wafers (about 80–90 wafers)
- 4–5 ripe but firm bananas, sliced ¼ inch thick
For the Whipped Cream Topping
- 1½ cups (360ml) heavy whipping cream, cold
- 3 tablespoons (24g) powdered sugar
- 1 teaspoon pure vanilla extract

Equipment
You don’t need any special tools for banana pudding. Gather a medium saucepan, a whisk, a rubber spatula, a 9×13-inch baking dish or deep trifle bowl (3–4 qt), a hand mixer or stand mixer for the whipped cream, and plastic wrap. That’s it.
How to Make Banana Pudding From Scratch
Step 1: Make the Vanilla Custard
In a medium saucepan, whisk together the sugar, cornstarch, and salt until evenly combined. Add the egg yolks and about ½ cup of the milk, whisking until you have a smooth paste — this prevents lumps when the remaining milk goes in.
Whisk in the remaining 2½ cups of milk until smooth. Set the saucepan over medium heat and cook, stirring constantly with a whisk or rubber spatula, until the mixture thickens and begins to bubble — this takes about 8–12 minutes. Once you see the first big bubble, keep cooking and stirring for exactly 2 more minutes to cook out the raw starch taste completely.
Remove from heat and stir in the butter and vanilla extract until the butter is fully melted. The custard should be thick, glossy, and coat the back of a spoon. Press through a fine mesh strainer if you spot any lumps.
Step 2: Layer the Pudding
Work while the custard is still warm — the heat softens the vanilla wafers into that iconic custardy texture. Spread a thin layer of custard on the bottom of your dish to anchor the first wafer layer. Add a single layer of vanilla wafers, then a layer of banana slices. Spoon about one-third of the remaining custard over the bananas, spreading to the edges. Repeat: wafers, bananas, custard. Finish with a final layer of wafers and custard on top.

Step 3: Chill
Press a sheet of plastic wrap directly onto the pudding surface — touching it — to prevent a skin from forming. Refrigerate for at least 4 hours, but overnight is even better. During this time, the wafers absorb moisture from the custard and transform from crispy cookies into soft, cakey layers that meld with the bananas. This slow transformation is the whole magic of the dish.
Step 4: Make the Whipped Cream and Serve
Just before serving, beat the cold heavy cream, powdered sugar, and vanilla extract with a hand mixer on medium-high until stiff peaks form — about 2–3 minutes. Spread or pipe over the top of the pudding. Garnish with crushed vanilla wafers or extra banana slices. Serve immediately after topping for the best whipped cream texture.

Pro Tips for the Best Banana Pudding
Use Ripe-But-Firm Bananas
This is the single most critical ingredient tip. Bananas that are too green won’t have enough sweetness or fragrance. Bananas that are overripe will turn to mush and make the layers watery. You want bananas that are fully yellow with just a few brown flecks — sweet, aromatic, and still firm enough to hold their shape when sliced. According to Serious Eats, bananas reach peak sweetness and texture right when they show light speckling — just before they soften.
Don’t Skip the Warm-Layering Step
Layering with hot custard is what causes the wafers to soften into those melt-in-your-mouth layers that make banana pudding so irresistible. If you cool the custard first, the wafers stay crispier — which some people prefer — but it’s a different dessert. The classic Southern version layers warm custard directly over the cookies.
Stir Constantly When Cooking the Custard
Don’t walk away from the stove. Cornstarch-based custards will scorch on the bottom and clump on the sides if left unattended. Use a rubber spatula to scrape the edges and bottom continuously, switching to a whisk as it starts to thicken.
Use Real Vanilla Extract
Banana pudding has a delicate flavor profile. Real vanilla extract makes a noticeable difference here. For an elevated version, steep a split vanilla bean in the warm milk (then remove before cooking) for a restaurant-quality result.
Variations and Twists
Peanut Butter Banana Pudding
Swirl 3 tablespoons of creamy peanut butter into the warm custard before layering. Substitute Nilla wafers for peanut butter cookies for double the peanut flavor.
Chocolate Banana Pudding
Replace ¼ cup of the sugar with ¼ cup of natural cocoa powder. The rich chocolate custard pairs beautifully with bananas. Use chocolate wafers or crushed Oreos in place of Nilla wafers. Pairs perfectly alongside our fudgy brownie recipe for a chocolate-forward dessert spread.
Churro Banana Pudding
Swap Nilla wafers for pieces of homemade churros and add ½ teaspoon of cinnamon to the custard. Use our easy homemade churros recipe — let them cool completely, cut into bite-sized pieces, and layer. The cinnamon-sugar crunch through every bite is an incredible mashup.
Individual Banana Pudding Cups
Layer into mason jars or clear dessert cups for party-perfect individual servings. They store beautifully in the fridge for up to 3 days without the whipped cream on top — add that just before serving.

Make-Ahead and Storage
How Far Ahead Can You Make It?
Banana pudding is best assembled 8–12 hours before serving — overnight is ideal. The custard needs time to set and the wafers need time to soften. You can assemble up to 24 hours in advance without issues.
How Long Does It Last in the Fridge?
Tightly covered with plastic wrap, banana pudding keeps for 3–4 days in the refrigerator. The bananas will continue to soften and may brown slightly by day 3 — still fine to eat but less visually perfect. Per FDA food safety guidelines, egg-based custards should be stored at 40°F or below and consumed within 4 days.
Can You Freeze Banana Pudding?
Not recommended. Custard-based desserts become grainy and watery when thawed, and bananas turn mushy and brown. Make this fresh and serve within 4 days for best results.
Banana Pudding vs. Other Banana Desserts
Banana pudding occupies a unique spot among banana desserts. Unlike moist banana bread, which bakes overripe bananas into a dense quick bread, banana pudding showcases fresh, ripe bananas as a central ingredient. Unlike banana cream pie, which uses a pastry crust and stiffer custard, banana pudding is softer and meant to be eaten with a spoon straight from the dish.
The Nilla wafer layer is integral in a distinctly Southern American way — the cookie isn’t just texture, it absorbs custard and becomes part of the creamy base, almost like a no-bake cake layer. This is the same technique that makes Italian tiramisu magical: the ladyfingers soak and transform. Our easy tiramisu recipe works on exactly the same principle.

Frequently Asked Questions
Can I use instant pudding mix instead of homemade custard?
Yes — two 3.4-oz boxes of instant vanilla pudding prepared with whole milk is a common shortcut. The result is lighter and less rich, but delicious for a quick weeknight version. For special occasions, the homemade custard is worth the extra 20 minutes.
Why are my bananas turning brown in the pudding?
Browning (oxidation) is natural once bananas are sliced. Use firm, just-ripe bananas rather than overripe ones; toss slices in a small amount of lemon juice before layering; and keep the dish tightly covered. The custard coating dramatically slows browning on the interior layers.
Can I make banana pudding without eggs?
Yes. Replace the egg yolks with 2 additional tablespoons of cornstarch (6 tablespoons total) and use oat milk or full-fat coconut milk instead of whole milk. Use coconut cream for the whipped topping. The custard will be slightly thinner but still flavorful.
What can I substitute for Nilla Wafers?
Ladyfingers, Chessmen butter cookies, shortbread, digestive biscuits, or graham crackers all work beautifully. For a gluten-free version, use gluten-free vanilla wafers (Kinnikinnick makes them) or gluten-free graham crackers.
How do I keep whipped cream from deflating?
Beat cold cream to stiff peaks and add the topping no more than 1–2 hours before serving. For a more stable topping, add ¼ teaspoon of cream of tartar to the cream before whipping, or fold in 1 teaspoon of instant pudding mix as a stabilizer.