

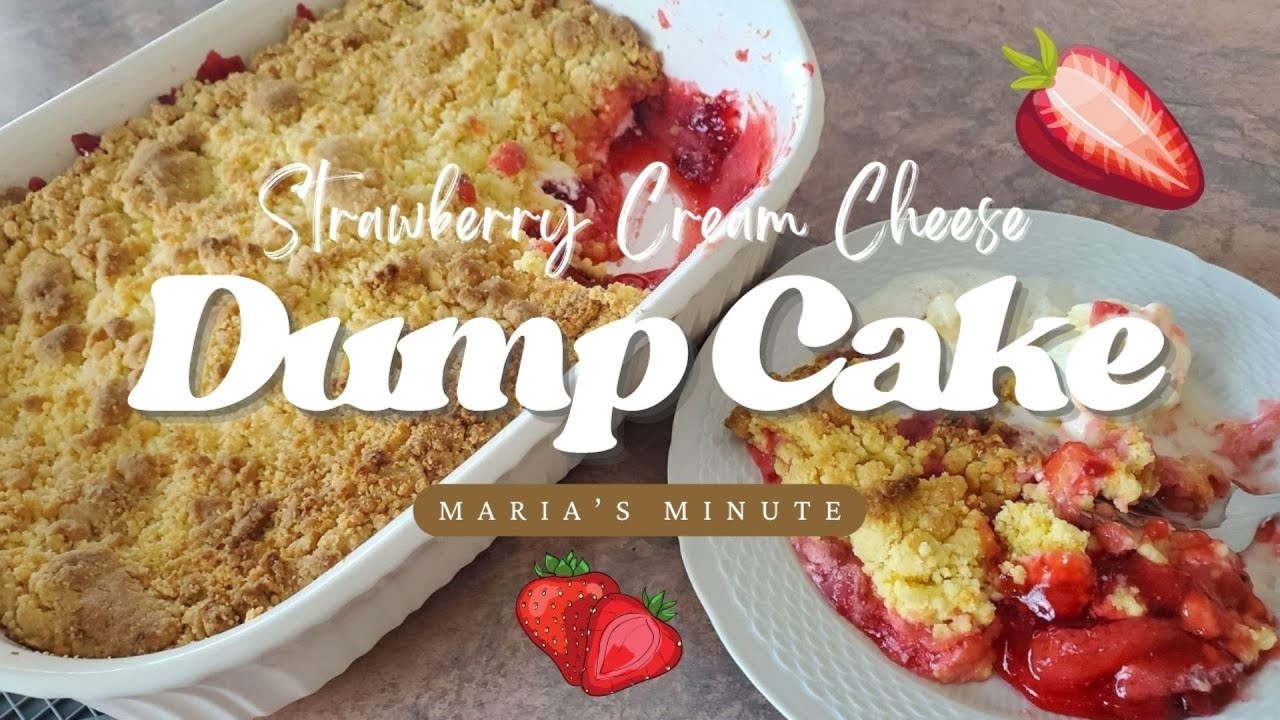
There’s something truly satisfying about a dessert that’s both effortless and packed with flavor. My Easy Strawberry Cheesecake Dump Cake Recipe is the perfect combination of creamy, fruity, and buttery goodness, all with minimal effort. If you love cheesecake, fruity desserts, and warm, comforting bakes, this recipe is about to become your new favorite!
What makes this dessert so special? It’s all about the layers! A rich, velvety cream cheese filling meets the vibrant sweetness of strawberry pie filling, all topped with a buttery, golden cake layer that practically melts in your mouth. The best part? No complicated steps or fancy techniques needed—just dump, bake, and enjoy!
This foolproof recipe is great for busy weeknights, last-minute gatherings, or whenever you need a crowd-pleasing dessert with minimal prep. Serve it warm with a scoop of vanilla ice cream or a dollop of whipped cream for an extra indulgent treat.
Whether you’re a seasoned baker or just starting out, this recipe is designed to be foolproof. It’s perfect for gatherings, weeknight treats, or even a special indulgence. For more dessert inspiration, check out this Pistachio Raspberry Cake that’s equally delightful!
Stay tuned for tips and variations to make this dessert your own. Let’s get baking and create something truly special!

Strawberry Cheesecake Dump Cake
Equipment
- 9×13-inch baking dish greased
- Mixing bowl
- Spatula for spreading layers
- Oven
Ingredients
- 2 cans strawberry pie filling (21 oz each)
- 8 oz cream cheese softened
- 0.5 cup powdered sugar
- 1 tsp vanilla extract
- 1 box yellow cake mix (15.25 oz)
- 0.5 cup unsalted butter melted
Instructions
- Preheat oven to 350°F (175°C) and grease a 9×13 inch baking dish.
- Spread the strawberry pie filling evenly across the bottom of the baking dish.
- In a mixing bowl, beat the cream cheese, powdered sugar, and vanilla extract until smooth.
- Drop spoonfuls of the cheesecake mixture over the strawberry filling and spread gently.
- Sprinkle the dry cake mix evenly over the top of the layers.
- Drizzle the melted butter evenly over the cake mix, covering as much as possible.
- Bake for 40-45 minutes, or until the top is golden brown and bubbly.
- Let the cake cool for 10 minutes before serving warm.
Notes
- Optional Equipment: A hand mixer can be used for blending the cheesecake mixture.
- Customization: Swap strawberry pie filling for cherry or blueberry for a different flavor.
- Storage: Store leftovers in an airtight container in the refrigerator for up to 3 days.
- Serving Tip: Top with whipped cream or a scoop of vanilla ice cream for extra indulgence.
Introduction & Overview
There’s something magical about a dessert that comes together with minimal effort yet delivers maximum flavor. This strawberry cheesecake creation is a favorite among home bakers for its simplicity and irresistible taste. With just a few ingredients and a straightforward process, you can whip up a treat that’s perfect for any occasion.
The star of this dessert is the strawberry pie filling, which brings a burst of fruity sweetness. Combined with a layer of creamy cheese and a fluffy mix, it creates a delightful contrast of textures. The “dump” technique is what makes this recipe so special—no elaborate mixing required. Just layer the ingredients in your baking dish, and let the oven do the rest.
As the dessert bakes, the butter melts into the mix, creating pockets of gooey goodness. The result is a warm, indulgent treat that’s perfect for sharing. Whether you’re a novice or an experienced baker, this recipe is designed to be foolproof and stress-free.
Serve it warm with a dollop of whipped cream or a scoop of ice cream for an extra touch of decadence. The combination of flavors and textures is sure to impress your guests. Stay tuned for more detailed insights into the ingredients and preparation process in the next sections.
| Ingredient | Quantity |
|---|---|
| Strawberry Pie Filling | 42 ounces (2 cans) |
| Cream Cheese | 8 ounces |
| Yellow Cake Mix | 15.25 ounces (1 box) |
| Butter | 1 cup |
This dessert is not just about ease—it’s about creating something truly special. So, grab your baking dish, and let’s get started on this delightful journey!
Ingredients Breakdown & Preparation Tips
Every ingredient plays a vital role in creating the perfect balance of flavors and textures. Let’s explore what makes this dessert so special and how you can tweak it to suit your taste.
Key Ingredients and Their Roles
The strawberry pie filling is the star of the show, bringing a tangy sweetness that pairs beautifully with the creamy layer. Cubing the cream cheese ensures it melts evenly, creating those delightful pockets of gooey goodness.
The cake mix adds a fluffy base, while the melted butter binds everything together, giving it a rich, indulgent texture. A dash of vanilla enhances the overall flavor, making each bite irresistible.
Ingredient Substitutions and Variations
Want to mix things up? Swap the yellow cake mix for a white cake or vanilla version for a lighter flavor. Experiment with different pie fillings like cherry or blueberry to create unique variations.
For a richer taste, use salted butter instead of unsalted. A dusting of powdered sugar on top adds a touch of elegance and sweetness.
- Use fresh ingredients from the store for the best results.
- Spend a few extra minutes layering the ingredients to enhance the texture.
- Adjust the sugar level to suit your preference.
These small tweaks can elevate your dessert and make it truly your own. Whether you’re baking for a special day or just treating yourself, these tips ensure a delicious outcome every time.
Step-by-Step Preparation Instructions
Let’s dive into the step-by-step process to create this mouthwatering dessert. With just a few simple steps, you’ll have a treat that’s as impressive as it is delicious. Follow along to ensure every layer comes together perfectly.
Preparing Your Baking Dish and Preheating
Start by preheating your oven to 350°F. This ensures the dessert bakes evenly and achieves that golden, crumbly texture. Grab a 9×13-inch baking dish and grease it thoroughly with non-stick spray or butter. This step prevents sticking and makes cleanup a breeze.
Layering the Strawberry Pie Filling, Cream Cheese, and Cake Mix
First, evenly spread the strawberry pie filling across the bottom of the dish. This creates a sweet, fruity base. Next, cube the cream cheese and scatter it over the filling. These cubes will melt into gooey pockets of flavor as it bakes.
Finally, sprinkle the cake mix evenly over the top. No mixing is needed—this preserves the distinct layers that make this dessert so special. For a richer finish, drizzle melted butter over the cake mix. This step ensures a crispy, golden topping.
Double-check that your oven is fully preheated before placing the dish inside. This attention to detail guarantees the best results. If you’re looking for more dessert inspiration, check out these blueberry dessert recipes for another fruity treat!
Baking Process and Timing
Baking is where the magic happens—turning simple layers into a golden, gooey masterpiece. The key to success lies in precise temperature settings. Preheat your oven to 350°F, the optimal heat for this recipe. This ensures even baking and a perfectly crisp top.
As the dessert bakes, the layers transform. The strawberry pie filling bubbles, the cream cheese melts into creamy pockets, and the cake mix turns golden. The aroma filling your kitchen is a sure sign that something delicious is on the way.
Baking time can vary between 30 to 50 minutes. Start checking at the 30-minute mark. Look for a set, slightly browned top. If it’s still too soft, give it a few more minutes. Monitoring in the final stages is crucial to avoid over-baking and losing that gooey texture we all love.
“The perfect cheesecake dump is golden on top, bubbly in the middle, and irresistibly gooey.”
Here’s a quick guide to baking times based on your oven:
| Oven Type | Baking Time |
|---|---|
| Conventional | 45-50 minutes |
| Convection | 30-35 minutes |
Trust your senses—when the edges are golden and the center is bubbly, it’s done. Let it cool for 10 minutes before serving. This patience ensures the layers set beautifully, making every bite a delight.
Easy Strawberry Cheesecake Dump Cake Recipe Details
The secret to this dessert’s success lies in its carefully measured ingredients. Using a 15.25 oz boxed mix ensures a fluffy base, while two cans of strawberry pie filling bring a burst of fruity sweetness. The 8 oz of cream cheese melts into gooey pockets, creating a delightful contrast of textures.
Why these exact amounts? The boxed mix provides consistency, and the canned filling saves time without compromising flavor. For the best results, use unsalted butter—it balances the sweetness perfectly. These details are key to achieving that signature cobbler-like effect.
Here’s a quick breakdown of the essentials:
- Boxed mix: 15.25 oz for a light, airy base.
- Cream cheese: 8 oz, cubed for even melting.
- Strawberry pie filling: 2 cans (42 oz total) for a fruity layer.
- Butter: 1 cup, melted for a golden, crispy topping.
I’ve found that these measurements create the perfect balance. However, feel free to experiment with different brands or slight adjustments. Trust the process—this approach delivers consistent, delicious results every time.
Recipe Variations and Creative Twists
One of the best things about this dessert is how versatile it can be—let’s explore some fun twists! Whether you’re looking to switch up the flavors or add a personal touch, these ideas will inspire your next bake.
Alternative Pie Filling Options
While the classic version uses strawberry, there’s no limit to the fruit fillings you can try. Blueberry, cherry, or peach are fantastic alternatives that bring their own unique sweetness. Each one pairs beautifully with the creamy layer, creating a whole new experience.

For a seasonal twist, consider using apple pie filling in the fall or raspberry in the summer. These small changes can make the dessert feel fresh and exciting every time you make it.
Customizing the Cake Mix Flavor
Swapping out the cake mix is another way to add variety. Chocolate cake mix creates a rich, decadent base, while French vanilla adds a subtle, elegant flavor. If you’re feeling adventurous, try a spice cake mix for a warm, cozy touch.
Here are some of my favorite combinations:
- Blueberry filling with vanilla cake mix for a light, fruity treat.
- Cherry filling with chocolate cake mix for a rich, indulgent twist.
- Peach filling with French vanilla cake mix for a sophisticated flavor.
Don’t forget to experiment with cream cheese too. Lower-fat options work just as well, and adding a dusting of powdered sugar or fresh fruit on top can elevate the presentation. These variations keep the charm of the original cheesecake dump while letting you make it your own.
Storage and Reheating Guidelines
Keeping your dessert fresh and delicious is just as important as baking it. Proper storage ensures the cheesecake dump retains its texture and flavor, making every bite as enjoyable as the first. Let’s dive into the best practices for cooling, storing, and reheating this delightful treat.
After baking, let the dessert cool for about 10-15 minutes. This allows the layers to set properly. Once cooled, transfer it to an airtight container and refrigerate. Stored correctly, it stays fresh for up to seven days. Always refrigerate leftovers to maintain quality and safety.
When you’re ready to enjoy it again, reheating is simple. For a quick option, use the microwave. Place a slice on a microwave-safe plate and heat for about 1 minute. For a crispier topping, use the oven. Preheat to 350°F, cover the dish with foil, and bake for 10-15 minutes. Both methods ensure the dessert stays warm and gooey.
Here’s a quick guide to reheating methods:
| Method | Time |
|---|---|
| Microwave | 1 minute |
| Oven | 10-15 minutes |
To avoid sogginess, reheat only the portion you plan to eat. This keeps the rest of the dessert fresh. The convenience of storage makes this recipe perfect for busy times—bake it ahead and enjoy it whenever the craving strikes!
Remember, this dessert is best enjoyed warm. The crisp topping and gooey fruit filling are at their peak when served fresh out of the oven or reheated. With these tips, your cheesecake dump will stay as delightful as the day you made it.
Pro Tips for Perfect Dump Cake Texture
Achieving the perfect texture for this dessert is all about mastering a few key techniques. The magic lies in the layers—keeping them distinct while ensuring they meld together beautifully during baking. Here’s how to get it just right.
Avoiding the Over-Mixing Pitfall
The charm of this dessert comes from its layered texture. Over-mixing can break down these layers, resulting in a less interesting consistency. Instead, simply dump the ingredients into your bowl and let the oven do the work. This approach preserves the pockets of sweetness and creamy goodness that make every bite special.
Using Butter Effectively for Even Coverage
Butter plays a crucial role in creating that golden, crumbly topping. For even coverage, slice cold butter into thin pats and scatter them over the cake mix. This ensures every inch gets a touch of richness. If you notice dry spots while baking, add a few more pats to balance it out.
Here are my top tips for perfect texture:
- Leave the batter unmixed—just dump and bake.
- Use cold butter for a uniform crumb topping.
- Check the cake at intervals to maintain the perfect crumbly top.
For more festive dessert ideas, check out these Mardi Gras dessert recipes. They’re just as fun to make and perfect for any celebration!
Experiment with these tips to make the dessert your own. Whether you’re serving it warm with a scoop of ice cream or enjoying it straight from the oven, these techniques ensure a delightful treat every time.
Common Mistakes and How to Avoid Them
Avoiding common mistakes can make all the difference in creating a flawless dessert. Even small errors can lead to uneven texture or dull flavor. Let’s explore how to sidestep these pitfalls and ensure your treat turns out perfectly every time.
One of the biggest mistakes is over-mixing the layers. The charm of this dessert lies in its distinct layers—fruit filling, creamy pockets, and a crumbly topping. Stirring them together can ruin the texture. Trust the process and let the oven work its magic.

Another common issue is mis-measuring ingredients. Using too much or too little of the cake mix or pie filling can throw off the balance. Always measure carefully, especially when working with boxed mixes and canned fillings.
Preheating the oven is another step you shouldn’t skip. An oven that’s not fully heated can result in undercooked centers. Set it to 350°F and let it reach the right temperature before baking. This ensures even cooking and a golden top.
Here’s a quick guide to avoiding common mistakes:
| Mistake | Solution |
|---|---|
| Over-mixing layers | Layer ingredients without stirring. |
| Mis-measuring | Use precise measurements for all ingredients. |
| Improper oven preheating | Preheat oven to 350°F before baking. |
If the butter isn’t evenly distributed, the topping can turn out patchy. To fix this, slice cold butter into thin pats and scatter them over the mix. This ensures every inch gets a touch of richness.
From my experience, these adjustments have saved many bakes. By avoiding these mistakes, you’ll create a dessert that’s as delightful to eat as it is to make. Happy baking!
Serving Suggestions and Presentation Ideas
Presentation can elevate even the simplest dessert to something extraordinary. Whether you’re serving it warm or cold, the way you present this treat can make all the difference. Let’s explore some ideas to make your dessert shine.
Serving it warm enhances the gooey texture, making every bite feel indulgent. The sweetness of the fruit filling pairs perfectly with a scoop of vanilla ice cream, creating a delightful contrast. If you prefer it cold, let it chill for a few hours—it’s just as delicious and perfect for a refreshing treat.
For creative plating, consider using a decorative bowl for individual servings. Arrange squares attractively on a platter for a crowd-pleasing display. A light drizzle of syrup or a dusting of powdered sugar adds a touch of elegance.
Garnishing is another way to elevate your dessert. Fresh fruit or a sprig of mint adds color and flavor contrast. These small touches make the dish look as good as it tastes.
From my experience, pairing this dessert with a glass of sparkling wine or a cup of coffee enhances the experience. For more dessert inspiration, check out these dark chocolate desserts that are equally delightful.
Whether you’re hosting a gathering or treating yourself, these serving and presentation ideas ensure your dessert is a hit. Enjoy the process and make it your own!
Nutritional Information and Ingredient Quality Considerations
Understanding the nutritional value of your dessert can help you make informed choices. A typical serving of this treat contains around 300–400 calories, with 15–20 grams of fat and 45–50 grams of carbohydrates. It also offers 3–5 grams of protein per serving. These numbers give you a clear picture of its daily value.
Using canned pie filling and a boxed cake mix impacts the overall nutritional profile. While convenient, these ingredients can add sugar and preservatives. For a healthier twist, consider sugar-free filling or a gluten-free mix. These swaps can reduce calories and improve the dessert’s nutritional balance.
Ingredient quality plays a huge role in the final outcome. Full-fat cream cheese adds richness, while low-fat options can lighten the dish. Always source high-quality ingredients from trusted stores. Fresh, natural components enhance both flavor and texture.
Here’s a quick breakdown of the nutritional stats per serving:
| Nutrient | Amount |
|---|---|
| Calories | 300–400 |
| Fat | 15–20g |
| Carbohydrates | 45–50g |
| Protein | 3–5g |
For those looking to indulge without guilt, check out these guilt-free dessert recipes. They’re perfect for balancing flavor and nutrition. Small tweaks can make a big difference—whether it’s swapping ingredients or adjusting portion sizes.
By focusing on quality and balance, you can enjoy this dessert while staying mindful of your health goals. Happy baking!
Conclusion
Creating this dessert has been a delightful journey—simple yet rewarding. With just a few ingredients from a box, you can whip up a treat that looks and tastes gourmet. The layers of sweetness and creamy texture make every bite unforgettable.
Throughout this post, I’ve shared handy tips, variations, and troubleshooting advice to ensure your success. Whether you’re using a bowl for mixing or experimenting with different pie fillings, the core method remains straightforward and foolproof.
I encourage you to make this recipe your own. Try new flavors or add your personal touch while staying true to the basics. It’s all about enjoying the process and savoring the results.
Thank you for following along! I’d love to see your creations—share them on social media and tag me. For more dessert inspiration, check out these Super Bowl desserts that are perfect for any celebration.
Happy baking, and here’s to many more delicious adventures in the kitchen!
FAQ
Can I use a different fruit filling instead of strawberry?
Absolutely! You can swap out the strawberry pie filling for other flavors like cherry, blueberry, or peach. Just make sure the consistency is similar for the best results.
What’s the best way to layer the ingredients?
Start with the pie filling at the bottom, followed by dollops of cream cheese, and then evenly sprinkle the cake mix on top. Drizzle melted butter over everything for a golden finish.
How do I prevent the cake from becoming too dry?
Avoid over-mixing the layers and ensure the butter is evenly distributed. This helps create a moist texture while baking.
Can I make this dessert ahead of time?
Yes! You can prepare it a day in advance and store it in the fridge. Just bake it when you’re ready to serve for the freshest taste.
What’s the ideal baking time and temperature?
Bake at 350°F for about 45-50 minutes, or until the top is golden brown and the filling is bubbling. Keep an eye on it to avoid over-baking.
Can I use homemade whipped cream for serving?
Definitely! Homemade whipped cream adds a delightful touch. Just whip heavy cream with a bit of sugar and vanilla for a creamy topping.
How should I store leftovers?
Cover the baking dish with plastic wrap or transfer slices to an airtight container. Store in the fridge for up to 3 days. Reheat gently in the oven or microwave.
Can I use a different cake mix flavor?
Yes, you can experiment with flavors like vanilla, yellow, or even chocolate cake mix to create a unique twist on this dessert.
What’s the best way to serve this dessert?
It’s delicious both warm and cold! Serve it with a scoop of ice cream or a dollop of whipped cream for an extra treat.
How can I ensure the cream cheese layer is evenly distributed?
Cut the cream cheese into small cubes and scatter them evenly over the pie filling. This helps it melt and blend smoothly during baking.
Made this for a potluck and it was the first thing gone! Everyone begged for the recipe.