

Milkshakes hold a special place in American food culture as the ultimate comfort drink that bridges generations. These frosty concoctions combine the perfect balance of creaminess and flavor, transforming simple ingredients into a dessert experience that satisfies both sweet cravings and nostalgic yearnings. Classic milkshake flavors like vanilla, chocolate, and strawberry have remained popular for decades, yet the beauty of this beloved treat lies in its remarkable adaptability to modern taste preferences and dietary needs.

From the first sip to the last slurp, milkshakes deliver a textural experience that few other desserts can match. The creamy texture and endless flavor possibilities have made milkshakes a staple at diners, ice cream parlors, and family kitchens across the country. Whether you’re five or ninety-five, there’s something undeniably delightful about the simple pleasure of a well-crafted milkshake that brings people together and creates lasting memories. Ready to dive into milkshake magic? Let’s explore everything from classic recipes to creative variations that will have you reaching for your blender!

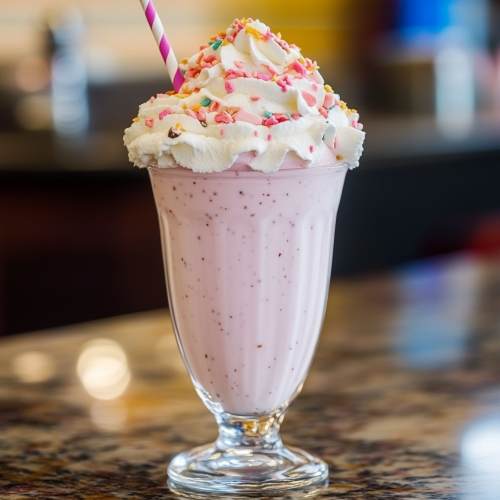
Classic Vanilla Milkshake
Equipment
- Blender
- Tall glasses
Ingredients
- 2 cups vanilla ice cream
- 3/4 cup milk whole milk recommended
- 1 tsp vanilla extract
- 1 tbsp sugar optional, adjust to taste
- 1/2 cup whipped cream for topping, optional
- 1 tbsp sprinkles optional, for garnish
Instructions
- In a blender, combine vanilla ice cream, milk, vanilla extract, and sugar (if using).
- Blend until smooth and creamy, about 30 seconds.
- Pour into tall glasses and top with whipped cream and sprinkles if desired.
- Serve immediately with a straw and enjoy.
Notes
- Customization: Swap vanilla ice cream for chocolate or strawberry for different flavors.
- Serving Tip: Chill your glasses ahead of time for an extra-cold treat.
- Dairy-Free Option: Use dairy-free ice cream and plant-based milk like almond or oat.
The Rich History Behind Your Favorite Frosty Treat
Milkshakes have come a long way from their humble beginnings. Originally appearing in the early 20th century, the first milkshakes were quite different from what we enjoy today. These early versions were frothy eggnog-like drinks that contained milk, eggs, and whiskey – a far cry from the family-friendly treat we know now! By the 1930s, the milkshake underwent a significant transformation, evolving into a creamy, ice cream-based treat that quickly became a staple in American diners and soda fountains across the country.
The introduction of the electric blender in the 1920s was a game-changer for milkshake history. Invented by Stephen Poplawski, this device made it possible to achieve that perfectly smooth consistency that defines a great milkshake. Soda jerks became skilled artists, crafting signature milkshakes that drew crowds to ice cream parlors and drugstore counters. The 1950s marked the golden age of milkshakes, when they became synonymous with American youth culture, served in distinctive tall glasses and often shared with two straws between young couples on dates.
Today’s milkshakes honor that nostalgic tradition while embracing modern twists and flavors. From the introduction of malt powder to create malteds to the development of cake batter milkshake recipes, the evolution continues. Fast food chains helped standardize and popularize milkshakes nationwide, making them accessible to everyone. What started as a whiskey-laced indulgence has transformed into a beloved treat that continues to bring joy to people of all ages.

Essential Ingredients for Milkshake Perfection
Creating the perfect milkshake starts with gathering the right ingredients. The foundation of any great milkshake is the careful balance between ice cream and milk. Here’s everything you’ll need to craft a delicious homemade milkshake:
- Ice Cream: 2-3 cups of premium ice cream (vanilla, chocolate, or strawberry work best as bases)
- Milk: ½-1 cup depending on desired thickness (whole milk provides the best creaminess)
- Sweeteners: Optional – sugar, honey, or maple syrup if additional sweetness is desired
- Flavor Enhancers: Vanilla extract, chocolate syrup, or fruit preserves
- Mix-ins: Cookies, candy pieces, chocolate chips, or fresh fruit
- Toppings: Whipped cream, sprinkles, maraschino cherries, chopped nuts, or cookie crumbles
The quality of your ice cream makes a significant difference in the final product. Premium ice cream with higher fat content creates a richer, creamier milkshake. While bargain brands can work in a pinch, they often contain more air and less fat, resulting in a less luxurious texture. For truly exceptional results, consider splurging on a high-quality ice cream or even making your own!
Essential Equipment for Milkshake Making
Beyond ingredients, having the right tools ensures your milkshakes turn out perfectly every time. These are the essentials for proper milkshake preparation:
- Blender: The most important tool for achieving that perfectly smooth consistency
- Long spoons: For mixing and reaching the bottom of tall glasses
- Tall glasses: Classic milkshake glasses or mason jars work beautifully
- Thick straws: Wide enough to handle the thickness of the shake
- Ice cream scoop: For measuring consistent amounts of ice cream
- Measuring cups: For precise milk-to-ice cream ratios
While a blender is the standard tool for milkshake creation, an immersion blender can also work well. If you’re planning to make milkshakes regularly, consider investing in a dedicated milkshake maker, which combines the functions of a blender with special features designed specifically for milkshakes. These machines often include cooling functions to keep your shake from melting too quickly during blending.

Step-by-Step Classic Milkshake Recipe
Now that you have all your ingredients and equipment ready, it’s time to create the perfect milkshake. This basic recipe can be customized with various flavors to suit any preference.
Prep Time: 5 minutes
Total Time: 5 minutes
Servings: 2
Calories: Approximately 350-400 per serving
Protein: 7g
Fats: 18g
Carbohydrates: 45g
Sugars: 40g
- Chill your glasses: Place two milkshake glasses in the freezer for about 15 minutes before you begin. This helps keep your milkshake cold longer.
- Prepare the ice cream: Allow the ice cream to soften slightly at room temperature for 5 minutes. This makes blending easier and results in a smoother consistency.
- Add base ingredients: Place 2 cups of ice cream and ½ cup of cold milk in your blender.
- Blend thoroughly: Start on low speed and gradually increase to medium, blending until smooth and creamy (about 30-45 seconds). Be careful not to over-blend as this can make the shake too thin.
- Check consistency: The milkshake should be thick but pourable. Add more ice cream for a thicker shake or more milk for a thinner one.
- Add flavors: If making a flavored milkshake, add syrups, extracts, or mix-ins and blend for another 15 seconds.
- Pour into glasses: Remove your chilled glasses from the freezer and pour the milkshake into them.
- Add toppings: Finish with a generous swirl of whipped cream, sprinkles, or a cherry if desired.
- Serve immediately: Milkshakes are best enjoyed right away while still cold and at peak creaminess.
The key to a perfect milkshake lies in the blending technique. Too little blending leaves chunks of ice cream, while too much can make the shake runny. Aim for that sweet spot where the milkshake is smooth but still thick enough to enjoy with a straw. For an extra-thick shake that resembles those from your favorite milkshake bar experiences, use 3 cups of ice cream with just ¼ cup of milk.

Delicious Variations to Try
Once you’ve mastered the basic milkshake, it’s time to get creative! The possibilities for customization are truly endless. Here are some popular variations that will take your milkshake game to the next level:
Classic Flavor Upgrades
- Chocolate Lover’s Dream: Use chocolate ice cream, add 2 tablespoons of chocolate syrup, and mix in 1 tablespoon of cocoa powder for an intense chocolate experience.
- Strawberry Fields: Blend strawberry ice cream with ¼ cup fresh strawberries and a splash of vanilla extract.
- Vanilla Bean Special: Use high-quality vanilla bean ice cream and add ½ teaspoon of real vanilla bean paste for an elevated flavor profile.
- The Malt Shop Classic: Add 2-3 tablespoons of malted milk powder to any flavor for that authentic old-fashioned taste.
For those who enjoy indulgent combinations, try creating a peanut butter chocolate milkshake by adding 2 tablespoons of creamy peanut butter to chocolate ice cream. The rich combination creates an irresistible flavor that tastes like a liquid peanut butter cup. Nutella lovers can substitute the peanut butter with 2 tablespoons of the chocolate-hazelnut spread for an equally delicious alternative.
Dessert-Inspired Creations
- Cookie Monster: Blend vanilla ice cream with 4-5 chocolate chip cookies and a splash of milk.
- Apple Pie à la Mode: Vanilla ice cream with ¼ cup apple pie filling and a pinch of cinnamon.
- Cheesecake Shake: Vanilla ice cream blended with 2 ounces of cream cheese and 2 tablespoons of graham cracker crumbs.
- Birthday Cake: Create a festive birthday cake milkshake with vanilla ice cream, cake batter extract, rainbow sprinkles, and pieces of actual cake.
Dairy-Free Alternatives
Don’t let dietary restrictions stop you from enjoying a delicious milkshake! These dairy-free options are just as satisfying:
- Coconut Dream: Coconut milk ice cream with coconut milk and toasted coconut flakes.
- Almond Joy: Almond milk with dairy-free chocolate ice cream, a drop of almond extract, and coconut cream.
- Banana Bliss: Frozen bananas blended with oat milk, a touch of maple syrup, and a sprinkle of cinnamon.
The beauty of milkshakes lies in their versatility. Don’t be afraid to experiment with unexpected ingredients like a pinch of sea salt with caramel, fresh herbs like mint with chocolate, or even a dash of espresso powder for a mocha-inspired treat. Some specialty milkshake shops even incorporate unexpected elements like unique dessert flavors that might inspire your next homemade creation.

Expert Tips for Storing Milkshakes
While milkshakes are best enjoyed immediately after preparation, sometimes you may find yourself with leftovers or want to prepare components in advance. Here’s how to properly store milkshakes for later enjoyment:
For short-term storage (up to 2 hours), place your milkshake in the refrigerator covered with plastic wrap or in a container with a tight-fitting lid. When you’re ready to enjoy it, give it a quick stir or a brief re-blend to restore its creamy texture. Be aware that separation is natural, and the consistency will change slightly from the original freshly made version.
For longer storage, freezing is your best option. Pour leftover milkshake into airtight containers, leaving about half an inch of space at the top to allow for expansion. When storing milkshakes in the freezer, label containers with the date and flavor. These frozen milkshakes will maintain good quality for up to 1 month, though the texture will be more ice cream-like when thawed.
A fun alternative for storing milkshakes is to pour them into popsicle molds for frozen milkshake pops. These make for delightful treats, especially on hot summer days. For best results when returning to a traditional milkshake consistency, allow the frozen mixture to thaw in the refrigerator for 15-20 minutes, then re-blend with a splash of fresh milk to restore creaminess.
If you’re planning a milkshake party or want to prepare components ahead of time, consider making a milkshake “kit” instead of fully prepared shakes. Store pre-scooped ice cream balls in the freezer on a parchment-lined tray, then transfer to a container once frozen solid. This makes for quick assembly when you’re ready to blend your fresh milkshakes.

Frequently Asked Questions About Milkshakes
Over the years of making milkshakes for friends and family, I’ve encountered many common questions. Here are answers to some of the most frequently asked questions about crafting the perfect milkshake:
Q: Can I make a milkshake without a blender?
A: Yes! While a blender creates the smoothest texture, you can make a decent milkshake with a mason jar or protein shaker. Use slightly softened ice cream and warm milk, and shake vigorously until combined. Another option is using a hand mixer with softened ice cream in a deep bowl.
Q: What’s the ideal ice cream to milk ratio?
A: For a classic thick milkshake, use 2 cups of ice cream to ½ cup of milk. Adjust according to your thickness preference – use more milk for a thinner shake or more ice cream for a thicker one. The density of your ice cream also affects this ratio.
Q: Why does my milkshake separate quickly?
A: This commonly happens when the shake is over-blended or too warm. Keep your ingredients well-chilled, blend just until smooth, and serve immediately. Using higher-fat ice cream and milk also helps prevent separation.
Q: Are there any low-calorie milkshake options?
A: Yes! Use low-fat ice cream or frozen yogurt with skim milk as your base. Boost flavor with extracts instead of syrups, and incorporate fresh fruit rather than candy mix-ins. A banana can add creaminess without all the calories of additional ice cream.
For anyone interested in expanding their dessert knowledge, I’d encourage you to submit your dessert recipe to share with other enthusiasts. Sharing recipes is a wonderful way to discover new flavor combinations and techniques you might not have considered.
Milkshakes: A Canvas for Sweet Creativity
Milkshakes represent more than just a refreshing treat—they’re an opportunity for culinary expression that crosses generational lines. From the nostalgic simplicity of a classic vanilla shake to elaborate creations loaded with cookies, candy, and syrups, these frozen delights offer endless possibilities for personalization. The beauty of homemade milkshakes lies in their adaptability to both traditional tastes and modern dietary needs.
Making milkshakes at home allows you to control quality, customize flavors to your exact preferences, and create moments of joy with family and friends. There’s something undeniably satisfying about the ritual of preparing and sharing these frosty concoctions. Whether you’re looking to recreate childhood memories or invent new flavor combinations, the humble milkshake serves as a perfect canvas for your sweet inspirations. If you discover a particularly amazing combination, consider submitting it to our business directory to share with other dessert enthusiasts!
So grab your blender, gather your favorite ingredients, and dive into the deliciously creamy world of homemade milkshakes. With just a few simple components and a dash of creativity, you can transform ordinary moments into extraordinary memories—one sip at a time. Regardless of how complex or simple your creation might be, the joy of that first creamy taste makes every milkshake an occasion worth celebrating!