
The easiest cookie recipe is a classic brown butter chocolate chip cookie: cream softened butter with brown and white sugar, beat in eggs and vanilla, stir in flour, baking soda, salt, and a generous heap of chocolate chips, then bake at 375°F for 9–11 minutes for thick, chewy cookies with crisp edges and a gooey center every single time.
Why This Is the Only Cookie Recipe You Need
Most “easy cookie recipes” are easy because they cut corners — and you can taste it. Dry, flat, or bland cookies are almost always the result of skipping one of three things: the right fat ratio, proper creaming time, or a rest period for the dough. This recipe doesn’t skip any of them, and it still comes together in about 15 minutes of active prep time with no chilling required (unless you want even thicker cookies).
The secret weapon is using both brown sugar and white sugar. Brown sugar contains molasses, which adds moisture, depth of flavor, and chewiness. White sugar promotes spread and crisp edges. The combination gives you a cookie that’s chewy in the center, slightly crisp at the edge, and packed with rich caramel-adjacent flavor that plain white sugar alone never achieves. According to the Serious Eats deep-dive on chocolate chip cookies, the butter-to-sugar-to-flour ratio is the single biggest variable in cookie texture — and this recipe nails it.

Ingredients
This recipe makes 24 cookies. Scale up or down as needed — it doubles beautifully for parties and bake sales.
- 2 1/4 cups (280g) all-purpose flour
- 1 tsp baking soda
- 1 tsp fine sea salt
- 1 cup (226g / 2 sticks) unsalted butter, softened to room temperature
- 3/4 cup (150g) granulated white sugar
- 3/4 cup (165g) packed light brown sugar
- 2 large eggs, room temperature
- 2 tsp pure vanilla extract
- 2 cups (340g) semi-sweet chocolate chips
- Flaky sea salt for finishing (optional but highly recommended)
Equipment: Stand mixer or hand mixer, two baking sheets, parchment paper, cookie scoop (1.5 tablespoon size), wire cooling rack.
Step-by-Step Instructions
Step 1: Prep Your Oven and Pans
Preheat the oven to 375°F (190°C). Line two baking sheets with parchment paper. Don’t use greased or buttered pans — greasing adds extra fat at the bottom that makes the cookies spread too thin and brown unevenly. Parchment paper is non-negotiable here; it also makes cleanup effortless.
Step 2: Whisk the Dry Ingredients
In a medium bowl, whisk together the flour, baking soda, and salt. Whisking distributes the leavening and salt evenly through the flour so every cookie bakes consistently. Set this aside. Don’t sift — for cookies, sifting isn’t necessary and can actually aerate the flour too much, resulting in cookies that puff then collapse flat.
Step 3: Cream the Butter and Sugars
In the bowl of a stand mixer fitted with the paddle attachment (or using a hand mixer and a large bowl), beat the softened butter, white sugar, and brown sugar on medium-high speed for 3–4 full minutes. The mixture should turn pale, fluffy, and noticeably increase in volume. This step is called “creaming” and it’s critical: you’re mechanically incorporating air bubbles into the fat, which gives cookies their lift and light texture.

Under-creamed butter produces dense, heavy cookies. If your butter was cold when you started, the mixture will look grainy rather than fluffy — give it another 2 minutes on medium speed. If it looks broken or curdled, your butter was too warm; pop the bowl in the fridge for 10 minutes and beat again.
Step 4: Add Eggs and Vanilla
Reduce the mixer to medium speed and add the eggs one at a time, beating for about 30 seconds after each. Scrape down the sides of the bowl. Add the vanilla extract and beat for another 30 seconds. The mixture should look smooth and cohesive — thick, creamy, slightly glossy. If it looks curdled, the eggs were too cold; it will come together once you add the flour.
Step 5: Add the Flour Mixture
Reduce the mixer to low speed and add the flour mixture in two additions, mixing just until no dry streaks remain — about 20–30 seconds per addition. Do not overmix. Overmixing develops gluten, which makes cookies tough and dense rather than tender. Stop the mixer the moment the last flour disappears into the dough.
Step 6: Fold in the Chocolate Chips
Add the chocolate chips and fold them in with a rubber spatula or on the lowest mixer speed for just a few seconds. Make sure the chips are evenly distributed throughout the dough. At this point, the dough is ready to bake. If you want thicker cookies, cover the bowl and refrigerate for at least 30 minutes (or up to 72 hours) — cold dough spreads less in the oven.
Step 7: Scoop and Bake
Use a 1.5 tablespoon cookie scoop (or two spoons) to portion the dough onto the prepared baking sheets, spacing the dough balls about 2 inches apart. This recipe yields 24 cookies. For thicker, bakery-style cookies, roll the portioned dough into balls and place them taller (don’t flatten).

Bake one sheet at a time on the center rack for 9–11 minutes. The cookies are done when the edges are set and lightly golden and the centers still look soft and slightly underdone — they will continue cooking on the hot pan for 3–5 minutes after you pull them from the oven (carryover cooking). This is the exact moment to pull them for a soft, chewy cookie. If you wait for the centers to look fully set in the oven, they’ll be overbaked and dry once they cool.

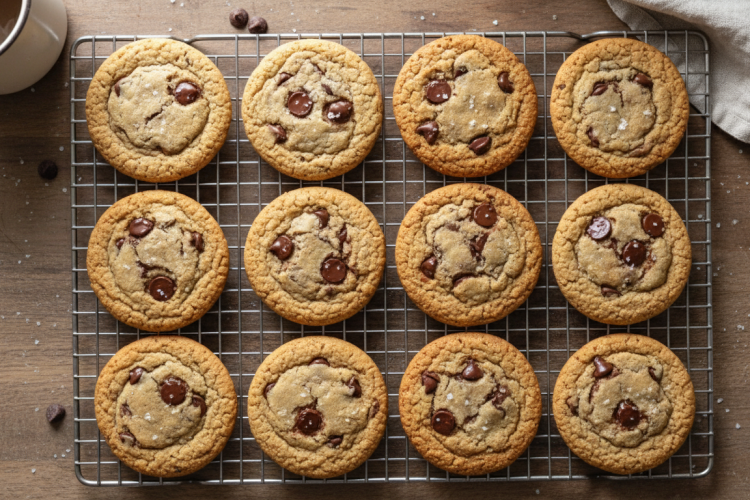
Immediately after pulling from the oven, sprinkle the cookies with a tiny pinch of flaky sea salt while they’re still hot. The salt amplifies the sweetness and makes the chocolate flavor pop dramatically. Let the cookies cool on the baking sheet for 5 minutes before transferring to a wire rack.
What Makes a Cookie Chewy vs. Crispy
Understanding the variables that control texture lets you customize this recipe to your exact preference:
- More brown sugar = chewier. Brown sugar is hygroscopic (absorbs moisture from the air) and keeps cookies soft longer. To maximize chewiness, use a 2:1 ratio of brown to white sugar.
- More white sugar = crispier, more spread. White sugar melts at a lower temperature and promotes spread and thin, lacey edges. For crispier cookies, flip the ratio.
- Extra egg yolk = richer, chewier. Yolks add fat without extra water (whites add water, which can make cookies cakey). Add one extra yolk to the recipe for a noticeably richer, denser, chewier result.
- Melted butter = chewier, denser, fudgier. Melted butter (instead of creamed) produces a cookie that’s almost brownie-like in texture. The tradeoff: less lift and a flatter cookie.
- Higher oven temp, shorter time = chewy center, crisp edge. 375°F for 9–11 min achieves this. Lower temp (325°F for 14 min) produces a more uniformly cooked, less-contrasted cookie.
- Chilled dough = thicker, more flavorful. Resting dough overnight allows the flour to fully hydrate and produces deeper, more complex flavor through enzymatic browning.

If you’re a fan of the chewy, gooey center style, you’ll also love our Chocolate Lava Cake Recipe — the same principle of intentional underbaking produces a molten center that’s deeply satisfying.
Cookie Variations
Snickerdoodle Cookies
Replace chocolate chips with nothing (plain dough). Add 1/2 tsp cream of tartar to the dry ingredients (it’s what gives snickerdoodles their signature tangy flavor and slightly chewy texture — without it, you just have a sugar cookie). Roll each dough ball in a mixture of 2 tablespoons sugar and 1 teaspoon cinnamon before baking. Bake at 375°F for 8–10 minutes.
Peanut Butter Cookies
Reduce butter to 1/2 cup and add 1 cup creamy peanut butter along with the butter at the creaming stage. Reduce flour to 1 3/4 cups. The peanut butter adds enough fat and structure to compensate. Roll into balls and press with a fork in a crosshatch pattern before baking. Bake at 350°F for 10–12 minutes.
Oatmeal Raisin Cookies
Replace 3/4 cup of the flour with 1 1/2 cups old-fashioned rolled oats. Swap the chocolate chips for raisins (or use a mix of both). Add 1 teaspoon cinnamon and 1/4 teaspoon nutmeg to the dry ingredients. The oats add chew and body. Bake at 350°F for 10–12 minutes.
Double Chocolate Cookies
Replace 1/4 cup of the flour with 1/4 cup Dutch-process cocoa powder. This turns the entire cookie base deeply chocolatey. Keep the chocolate chips for a double-chocolate result, or use white chocolate chips for a contrast. Bake at 350°F for 10–11 minutes — the cocoa makes it harder to judge doneness by color alone, so watch the edges carefully.

For more inspiration, check out our Churro Cake Recipe and Easy No-Bake Cheesecake — great companion recipes for a full dessert spread. And if you love the cinnamon-sugar flavor profile of snickerdoodles, our Salted Caramel Churros Recipe scratches the same itch in a totally different format.
Storage and Make-Ahead Tips
Storing Baked Cookies
Store baked cookies at room temperature in an airtight container for up to 5 days. For maximum softness, add a slice of sandwich bread to the container — the cookies absorb moisture from the bread and stay soft for days. Replace the bread slice every 2–3 days.
Freezing Baked Cookies
Baked cookies freeze well for up to 3 months. Cool completely, then store in a zip-top freezer bag with parchment between layers. Thaw at room temperature for 30 minutes, or warm in a 300°F oven for 5 minutes for that fresh-from-the-oven effect.
Freezing Cookie Dough
This is the ultimate make-ahead move. Scoop the dough into balls, freeze them on a baking sheet until solid (about 2 hours), then transfer to a freezer bag. Frozen dough balls keep for up to 3 months. Bake directly from frozen — just add 2–3 minutes to the baking time. No thawing needed. This means you can have fresh-baked cookies in under 15 minutes any time the craving hits.

For more baking tips and tricks, our Why Is My Cake Crumbly guide covers core moisture and structure principles that apply equally well to cookies. And for a fun, themed treat you can bring to any gathering, our Glow in the Dark Cake Recipe is a crowd-stopper every time.
Frequently Asked Questions
Why are my cookies flat?
Flat cookies are almost always caused by one of three things: butter that was too warm or melted before creaming (use room-temperature butter, which holds its shape but yields to pressure — not greasy or melted), not enough flour (spoon flour into the measuring cup and level it off rather than scooping directly, which compacts the flour), or baking on hot pans (let your baking sheets cool completely between batches). Chilling the dough for 30 minutes before baking is the most reliable fix for flat cookies.
Can I use salted butter instead of unsalted?
Yes, with an adjustment: reduce the added salt in the recipe from 1 teaspoon to 1/4 teaspoon. Salted butter works fine for cookies, though different brands contain varying amounts of salt, which makes it harder to control the final flavor precisely. If you bake frequently, unsalted butter is the better default because it gives you full control.
Do I have to chill the dough?
No — this recipe works without chilling and produces great cookies at room temperature dough. However, chilling the dough for 30 minutes to 72 hours produces noticeably thicker, more flavorful cookies: the butter firms up (less spread), the flour fully hydrates (better texture), and the sugars partially break down (more complex, caramel-like flavor). If you have time, chilling is always worth it. If you don’t, bake right away — the cookies will still be delicious.
What’s the best type of chocolate chip to use?
Semi-sweet chocolate chips (about 50–60% cacao) are the classic choice and what this recipe is calibrated for. Bittersweet chips (60–70% cacao) produce a more intense, less sweet chocolate flavor and pair well with the sweeter brown sugar base. Milk chocolate chips produce a sweeter, milder cookie. For a more complex result, chop a chocolate bar into irregular pieces instead of using chips — the varied sizes create both small pockets of melted chocolate and larger gooey pools.
How do I make cookies thicker and bakery-style?
Three techniques combined produce the thickest bakery-style result: (1) chill the dough for at least 1 hour, (2) roll each portion into a tall ball rather than a flattened disc — place it on the baking sheet standing up, not squashed down, and (3) after baking, while the cookies are still hot, use a large round cookie cutter slightly bigger than the cookie and swirl it around the cookie in a circular motion to push the edges inward. This “scoot” technique makes perfectly round, thick cookies as they set.