
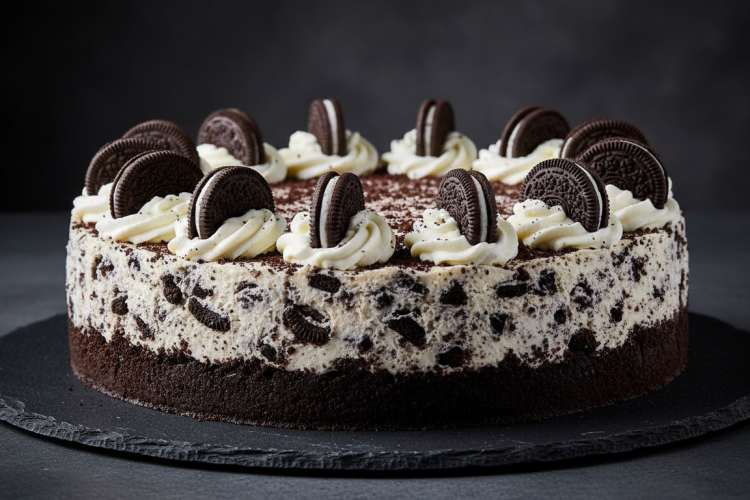
This Oreo cheesecake has a crunchy Oreo crust, a creamy cookies-and-cream filling packed with Oreo pieces, and a whipped cream topping with whole Oreos — it’s the ultimate Oreo dessert and easier to make than you think. Baked in a water bath for a crack-free surface, this cheesecake slices perfectly and tastes even better on day two.
Ingredients
Oreo Crust
- 24 Oreo cookies (with filling), finely crushed — about 2 cups crumbs
- 4 tbsp (55g) unsalted butter, melted
Oreo Cheesecake Filling
- 32 oz (900g) full-fat cream cheese, room temperature
- 1¼ cups (250g) granulated sugar
- 1 cup (240ml) sour cream, room temperature
- 1 tsp vanilla extract
- 3 large eggs, room temperature
- 16 Oreo cookies, roughly chopped (leave some larger chunks)
Topping
- 1½ cups heavy whipping cream
- 2 tbsp powdered sugar
- 6–8 whole Oreos for decoration
- Additional crushed Oreos for sprinkling
Step 1: Make the Oreo Crust
Pulse 24 Oreos (filling included) in a food processor until fine crumbs. Mix with melted butter until the mixture resembles wet sand. Press firmly into the bottom and 1 inch up the sides of a 9-inch springform pan. Freeze the crust for 20 minutes while you make the filling — this ensures it holds its shape during baking.
Step 2: Make the Oreo Filling
Beat room-temperature cream cheese on medium speed for 3–4 minutes until completely smooth and lump-free. Add sugar and beat another 2 minutes. Add sour cream and vanilla, mixing on low until combined. Add eggs one at a time, mixing on low just until each is incorporated — do not overbeat after adding eggs (overmixing incorporates too much air and causes cracking).
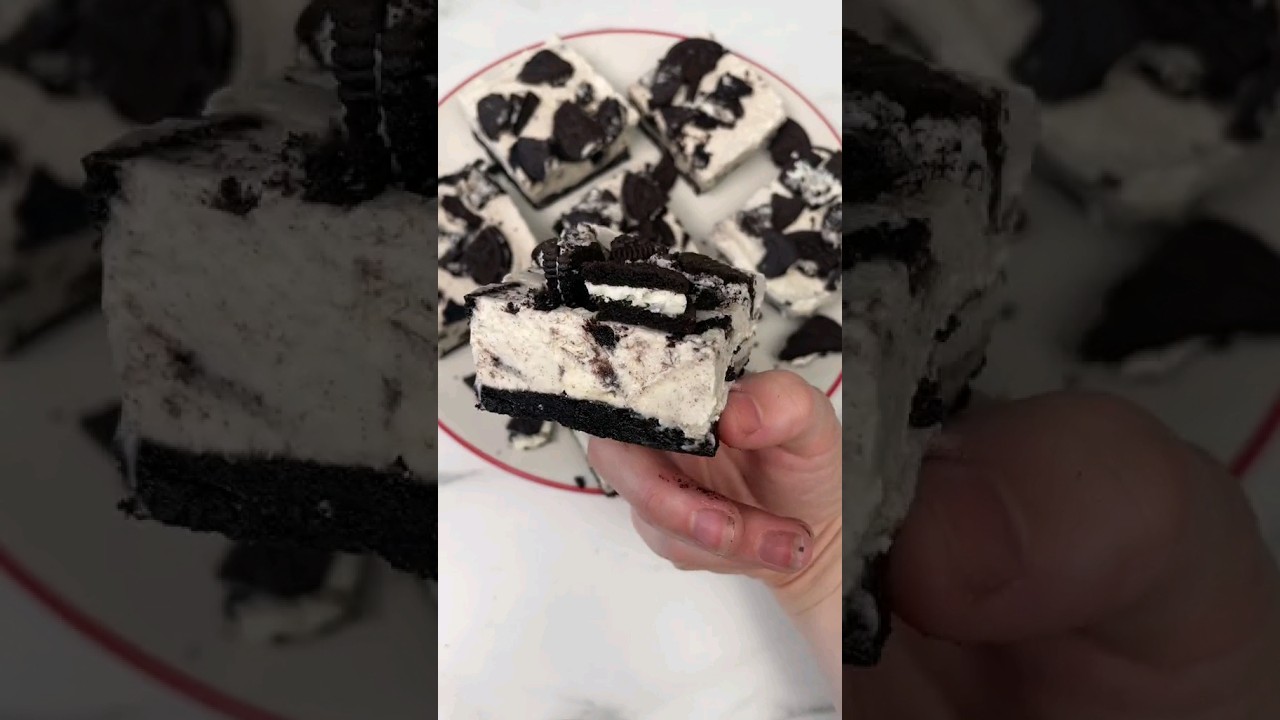
Gently fold in the roughly chopped Oreo pieces with a rubber spatula. Keep some chunks large for texture — you want visible Oreo pieces throughout every slice. Pour filling over the frozen crust and smooth the top.
Step 3: Water Bath Setup
A water bath (bain-marie) keeps the oven humid and prevents the cheesecake from cracking. Wrap the outside of your springform pan tightly in two layers of aluminum foil to prevent leaks. Place the wrapped pan in a large roasting pan. Pour boiling water into the roasting pan until it reaches 1 inch up the sides of the springform.
Alternatively, place a separate pan of boiling water on the rack below the cheesecake — this is the “steam method” and eliminates any leaking risk while still providing moisture.
Step 4: Bake and Cool
Bake at 325°F (163°C) for 60–70 minutes. The edges should be set and slightly puffed; the center should still have a slight jiggle (like Jell-O, not liquid). Turn off the oven and crack the door open — leave the cheesecake inside for 1 hour. This gradual cooling prevents sudden temperature changes that cause cracking.
Remove from the oven and water bath. Run a thin knife around the edge immediately. Let cool completely at room temperature (about 1 hour more), then refrigerate for at least 8 hours or overnight before removing the springform ring.
Step 5: Top and Decorate
When fully chilled, whip heavy cream with powdered sugar to stiff peaks. Pipe or spread over the top of the cheesecake. Arrange whole Oreos around the edge and sprinkle crushed Oreos over the center. For a cleaner look, press whole Oreos upright into the whipped cream border.
For another gorgeous cheesecake, see our Butterbeer Cheesecake — equally impressive and Harry Potter-approved. Or try our Easy No-Bake Cheesecake for a no-oven version.
Tips for the Best Oreo Cheesecake
- Room temperature everything: Cold cream cheese, sour cream, or eggs lead to lumpy batter. Set them out 2 hours ahead.
- Don’t skip the overnight chill: Cheesecake needs time to fully set. A rushed cheesecake slices messily.
- Clean slices: Use a sharp knife dipped in hot water and wiped dry between each cut.
- Chunk size matters: Mix some fine Oreo crumbs into the batter for flavor throughout, but keep larger chunks for visual texture.
- No water bath? Use the steam method (pan of water on lower rack) and don’t open the oven door during baking.
Can I make Oreo cheesecake without a springform pan?
Yes — use a deep 9-inch pie dish or 9×13 pan and serve directly from the dish. Unmolding won’t be possible but it tastes identical.
How do I prevent Oreo cheesecake from cracking?
Use a water bath, don’t overbeat after adding eggs, cool gradually in the oven with the door cracked, and run a knife around the edge immediately after baking.
Can I use Double Stuf Oreos?
Yes, for the filling and topping. For the crust, regular Oreos are better since the extra filling can make the crust greasy.
How long does Oreo cheesecake last in the fridge?
Up to 5 days covered in the refrigerator. It actually tastes best on days 2–3 after the flavors have melded.
Can you freeze Oreo cheesecake?
Yes. Freeze without toppings, wrapped tightly in plastic and then foil. Keeps up to 2 months. Thaw overnight in the fridge and add whipped cream and Oreos before serving.
Mastering the Water Bath for a Perfect Crumb
One of the most reliable ways to keep your Oreo cheesecake silky and free of cracks is to bake it in a water bath, also known as a bain‑marie. The gentle, moist heat prevents the edges from cooking too quickly while the center stays supple. Begin by wrapping the outside of your springform pan with a double layer of heavy-duty aluminum foil; this barrier stops water from seeping into the crust. Next, place the pan in a larger roasting pan and pour boiling water until it reaches about halfway up the sides of the cheesecake pan. The water should be hot, not boiling, when you slide the pan into the oven—this helps maintain a consistent temperature throughout the bake. As the cheesecake rises, the water bath cushions it, reducing the likelihood of a sudden collapse that can cause cracks. For a deeper dive into water‑bath techniques, see our detailed guide on cheesecake baking tips. The method may seem a bit extra, but the payoff is a flawless surface that looks as good as it tastes, and it’s a technique trusted by professional pastry chefs worldwide.
Flavor Boosters and Mix‑In Ideas
While the classic Oreo‑laden version is already a crowd‑pleaser, you can elevate the flavor profile with a few thoughtful additions. Swirl in a tablespoon of espresso powder dissolved in a splash of hot water for a subtle coffee kick that pairs beautifully with the chocolatey cookies. If you’re a fan of nutty undertones, fold in toasted, finely chopped hazelnuts or pecans just before pouring the batter over the crust; the nuts add a pleasant crunch that contrasts the creamy filling. For a festive twist, mix in a handful of white‑chocolate chips or a drizzle of caramel sauce after the cheesecake has cooled, creating ribbons of sweetness that melt into each bite. Remember, any extra moisture can affect the bake, so keep mix‑ins dry and evenly distributed. For inspiration on creative cheesecake variations, explore our post on creative cheesecake recipes. These small tweaks let you customize the dessert for holidays, birthdays, or simply to match your personal palate, turning a beloved classic into a signature treat.
Storing, Serving, and Making the Most of Leftovers
Proper storage is key to preserving the creamy texture and rich Oreo flavor of your cheesecake. Once fully cooled, cover the springform pan tightly with plastic wrap or transfer the cake to an airtight container. Refrigerate for up to five days; the cheesecake actually becomes more set and flavorful as the flavors meld. If you need to keep it longer, the dessert freezes beautifully—wrap it in a double layer of foil and then place it in a freezer‑safe bag for up to two months. When you’re ready to serve, let the cheesecake thaw in the refrigerator overnight, then bring it to room temperature for about 20 minutes before slicing; this ensures each slice is soft and buttery. For an extra touch, garnish with a dusting of crushed Oreo crumbs and a drizzle of chocolate ganache. According to Serious Eats, gentle handling during cooling and storage prevents the formation of a dry outer layer, keeping every bite as luscious as the first. Pair the cheesecake with a glass of cold milk or a bold espresso for a perfect ending to any meal.
Mastering the Water Bath for a Silky Texture
One of the most reliable ways to keep your Oreo cheesecake creamy and crack‑free is to perfect the water bath, also known as a bain‑marie. Begin by wrapping the bottom of your springform pan in a double layer of heavy‑duty aluminum foil; this prevents water from seeping into the crust and diluting the flavor. Next, place the pan in a larger roasting pan and pour boiling water until it reaches about halfway up the sides of the cheesecake pan—too low and the heat will be uneven, too high and you risk water splashing onto the batter. Keep the oven temperature steady at 325°F (163°C) and avoid opening the door during the first 45 minutes of baking; sudden temperature changes are the primary cause of cracks. After the initial bake, turn off the oven, crack the door open a few inches, and let the cheesecake sit for an additional 30 minutes; this gradual cooling further reduces stress on the surface. For a deeper dive into water‑bath techniques, see our step‑by‑step water bath guide, and for scientific backing on gentle baking methods, check out the article from Serious Eats. Following these steps will give you a velvety, crack‑free Oreo cheesecake every time.
Storing and Serving Your Oreo Cheesecake
Proper storage not only preserves the luscious texture of your Oreo cheesecake but also enhances its flavor as the cookies continue to meld with the creamy filling. Once the cheesecake has cooled completely, cover the springform pan loosely with plastic wrap, then wrap the entire pan in foil to protect it from freezer burn if you plan to freeze it. In the refrigerator, the cheesecake will stay fresh for up to five days; just be sure to keep it on a flat shelf to avoid any wobbling that could cause cracks. When you’re ready to serve, let the cake sit at room temperature for 15‑20 minutes—this softens the crust and makes slicing easier. For an elegant presentation, run a thin, hot knife (dip it in hot water, wipe dry) through the sides of the pan before releasing the springform; this yields clean, uniform slices. Pair the cheesecake with a dollop of whipped cream, a drizzle of chocolate ganache, or a handful of fresh berries for contrast. For more serving ideas, explore our collection of cheesecake garnishes, and for authoritative storage guidelines, refer to the USDA’s recommendations on dairy product safety. With these tips, your Oreo cheesecake will remain a show‑stopping dessert from the first slice to the last crumb.