
Easy chocolate mousse is a rich, airy French dessert made from just five ingredients — dark chocolate, eggs, heavy cream, sugar, and vanilla — whipped and folded together to create a silky, cloud-like texture that sets firm in the refrigerator in about two hours. No baking required, no special equipment needed, and the result is an elegant dessert worthy of any dinner party or weeknight craving.

Why You’ll Love This Chocolate Mousse
Chocolate mousse has a reputation for being complicated and fussy — a restaurant dessert, not a home kitchen staple. That reputation is completely undeserved. This recipe strips the process down to its essentials: melt chocolate, whip cream, fold together, chill. That’s really it.
The result is a mousse that’s intensely chocolatey without being dense, light without being frothy, and rich without being cloying. The key is quality chocolate and patience during the folding step — rushing that fold is the only real way to go wrong here.
It also makes a fantastic base for other desserts. Spoon it into churro ice cream bowls for a wildly impressive dessert mashup, or pipe it between the layers of a fluffy chocolate cake as a filling. Once you have the technique down, the applications are endless.
Ingredients You’ll Need
The beauty of chocolate mousse is its brevity. Five pantry staples yield something truly spectacular:
- Dark chocolate (200g / 7 oz) — Use a bar-style chocolate with 60–70% cocoa for the best flavor. Chips work in a pinch but bar chocolate melts more evenly. Brands like Ghirardelli 60% Bittersweet or Lindt Excellence 70% are ideal.
- Heavy whipping cream (1½ cups / 360ml) — Split into two portions: 3 tablespoons for melting with the chocolate (adds smoothness), and the rest for whipping to stiff peaks.
- Eggs (4 large) — Separated. Yolks go into the chocolate mixture for richness; whites are whipped and folded in for lift. Using room-temperature eggs makes separation easier.
- Granulated sugar (3 tablespoons) — Added to the egg yolks and to the egg whites separately. Keeps everything in balance without making the mousse cloyingly sweet.
- Pure vanilla extract (1 teaspoon) — Rounds out the chocolate flavor and adds warmth. Use real vanilla, not imitation.
- Pinch of salt — A tiny amount amplifies all the chocolate notes significantly.
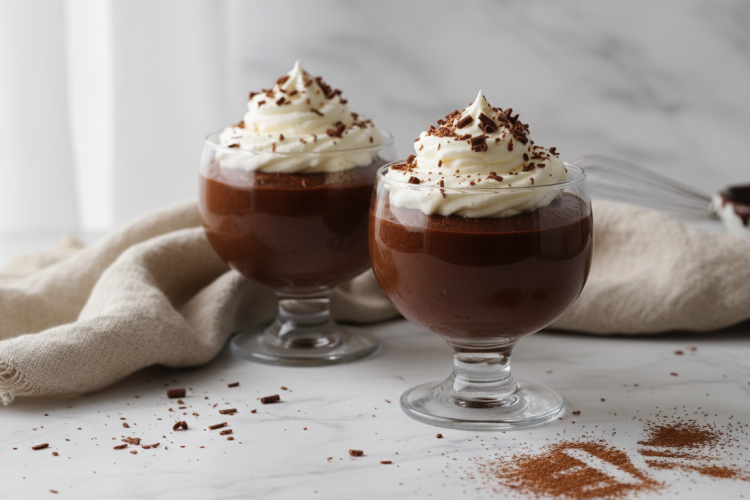
Optional garnishes: whipped cream, chocolate shavings, raspberries, sea salt flakes, mint leaves, crushed churro pieces, or a light dusting of cocoa powder.
Equipment
You don’t need anything special — just what’s likely already in your kitchen:
- Medium heatproof bowl (for double boiler)
- Saucepan
- Hand mixer or stand mixer
- Two large mixing bowls
- Rubber spatula
- Serving glasses, ramekins, or small bowls (6–8 servings)
How to Make Easy Chocolate Mousse: Step-by-Step
Follow these steps carefully and you’ll have a flawless mousse every single time.
Step 1: Melt the Chocolate
Set up a double boiler by filling a saucepan with about 1 inch of water and bringing it to a gentle simmer over medium-low heat. Place your heatproof bowl on top — it should sit above the water, not touching it.
Add the chopped chocolate and 3 tablespoons of heavy cream to the bowl. Stir gently with a spatula as the chocolate melts, keeping the heat low. You’re looking for a smooth, glossy mixture with no lumps. Once melted, remove from heat and let it cool to room temperature — about 10 minutes. This step matters. Adding hot chocolate to cold eggs will scramble them instantly.

Step 2: Beat the Egg Yolks
While the chocolate cools, whisk the egg yolks with 2 tablespoons of sugar in a bowl until the mixture turns pale yellow and slightly thickened — about 1–2 minutes with a hand mixer or 3 minutes by hand. This adds richness and helps the mousse hold its structure.
Once the chocolate has cooled to room temperature, stir the egg yolk mixture into it along with the vanilla extract and pinch of salt. Mix until fully combined. The base should be thick, shiny, and smooth.
Step 3: Whip the Cream
Pour the remaining heavy cream into a clean, cold bowl. A chilled bowl helps the cream whip faster and hold its structure better — put it in the freezer for 5 minutes before starting if you have time.
Beat the cream on medium-high speed until stiff peaks form. Stiff peaks means when you lift the beaters, the cream holds its shape and doesn’t droop. Don’t over-whip — if it starts looking grainy or curdled, you’ve gone too far. Stop as soon as you see those clean, stable peaks.

Step 4: Whip the Egg Whites (Optional but Recommended)
For the lightest possible mousse, beat the egg whites with the remaining tablespoon of sugar until stiff peaks form. This is the same technique used in classic French mousse au chocolat. The whipped egg whites add an ethereal airiness that cream alone can’t replicate.
Make sure your bowl and beaters are completely clean and grease-free before whipping egg whites — any fat residue will prevent them from whipping properly. This is also why you do the cream first, then clean the beaters, then whip the whites.
If you prefer a simpler, egg-white-free version, you can skip this step and use all cream. The mousse will be slightly denser but still absolutely delicious — similar to the style used in many American chocolate mousse recipes.
Step 5: Fold Everything Together
This is the critical step that determines the final texture of your mousse. The goal is to combine the chocolate base with the whipped cream (and egg whites) without deflating all the air you’ve just incorporated.
Start by folding one-third of the whipped cream into the chocolate mixture to lighten it. Use a large rubber spatula and a gentle J-shaped motion — cut down through the center, sweep along the bottom, and fold up and over. Rotate the bowl a quarter turn with each fold. Once that first third is incorporated, fold in the remaining cream and the egg whites together.

Stop folding as soon as no white streaks remain. A few gentle folds too many is far better than a dozen too few — over-folding deflates the mousse and gives you a dense, heavy result. You’ll see light-colored swirls gradually disappearing; stop when the mixture looks uniform but still airy.
Step 6: Portion and Chill
Spoon or pipe the mousse into individual serving glasses, ramekins, or a large serving bowl. For a neater presentation, use a piping bag or a zip-lock bag with the corner snipped off. Tap the glasses gently on the counter to settle the mousse and smooth the top.

Cover each glass loosely with plastic wrap (don’t press it onto the surface — it will mar the top). Refrigerate for at least 2 hours, or up to 24 hours. The mousse firms up as it chills, developing its final airy-but-dense texture.
The Science Behind Chocolate Mousse
Chocolate mousse works because of a culinary technique called emulsification and aeration. The fat in the egg yolks and cream emulsifies with the cocoa butter in the chocolate, creating a stable, smooth base. The whipped cream and egg whites introduce countless tiny air bubbles into that base — air bubbles that remain trapped because the chocolate fat coats and stabilizes them.
According to the Serious Eats Food Lab, the ratio of chocolate to cream (and how you heat and cool each component) is the primary variable that determines mousse texture. Too much chocolate relative to cream produces something dense and fudge-like. Too little chocolate and the mousse won’t set properly. The 200g of chocolate to 1½ cups cream ratio in this recipe hits the sweet spot: firm enough to hold shape, light enough to feel airy on the spoon.
Temperature management is equally important. Chocolate that’s too warm when you fold in the cream will partially melt the fat structure in the whipped cream and deflate it. Too cold and the chocolate can seize and create lumps. Room temperature — roughly 70–75°F (21–24°C) — is the target for the chocolate base before folding.
Chocolate Mousse Variations
Once you’ve mastered the base recipe, the flavor variations are practically endless:
White Chocolate Mousse
Swap the dark chocolate for good-quality white chocolate (Valrhona or Ghirardelli Premium). White chocolate mousse is sweeter and more delicate — reduce the sugar to 1 tablespoon and add a pinch of almond extract for complexity. Works beautifully as a filling in a lemon dessert or layered with fresh berries.
Milk Chocolate Mousse
Use milk chocolate in place of dark for a sweeter, milder version that kids especially love. Milk chocolate has more sugar and less cocoa butter, so increase the chocolate slightly to 230g and reduce the added sugar to 1 tablespoon total.
Mocha Chocolate Mousse
Add 1–2 teaspoons of instant espresso powder to the melted chocolate along with the vanilla. Coffee amplifies chocolate flavor dramatically — this is one of the most impactful flavor additions you can make. The mousse still tastes primarily of chocolate, but with a depth and intensity that’s hard to achieve any other way.
Orange Chocolate Mousse
Add 1 tablespoon of Grand Marnier or Cointreau and the zest of one orange to the chocolate base. The citrus brightens the richness of the dark chocolate beautifully. This combination has been a French bistro staple for decades — and for good reason.
Mexican Chocolate Mousse
Add ½ teaspoon of cinnamon and a tiny pinch of cayenne to the chocolate base. This nods to traditional Mexican hot chocolate and pairs beautifully with caramel churros — the cinnamon-chocolate combination is practically made for the cremefilledchurros.com flavor universe.
Vegan Chocolate Mousse
Use full-fat coconut cream in place of heavy cream (refrigerate the can overnight and scoop the solid cream from the top — discard the liquid). Replace the eggs with the liquid from one can of chickpeas (aquafaba) — whip it to stiff peaks exactly as you would egg whites. The result is a fully vegan mousse that’s genuinely impressive.
Make-Ahead and Storage
Chocolate mousse is one of the best make-ahead desserts in existence. It actually improves with a few hours in the refrigerator as the texture firms up and the flavors meld.
- Make-ahead window: Up to 24 hours before serving. Cover tightly with plastic wrap.
- Refrigerator storage: 3–4 days. The texture may become slightly denser after day 2, but the flavor remains excellent.
- Freezer: Not recommended. Freezing and thawing breaks down the aerated structure and can cause the chocolate to separate from the cream. The result is grainy and unappetizing.
- Serving temperature: Remove from the refrigerator 10 minutes before serving. Slightly cool (not fridge-cold) brings out the chocolate flavor more fully.
What to Serve With Chocolate Mousse
Chocolate mousse is a complete dessert on its own, but the right garnishes and accompaniments take it to another level:
- Fresh berries — Raspberries, strawberries, or blueberries cut through the richness with acidity. A small pile on top is classic for a reason.
- Whipped cream — A small dollop adds lightness and visual appeal. Add just before serving so it doesn’t deflate.
- Chocolate shavings or curls — Use a vegetable peeler on the side of a room-temperature chocolate bar. Elegant and takes 30 seconds.
- Tuile cookies or wafers — Add a crunchy textural contrast. Cigarette cookies (the thin rolled wafer type) are traditional.
- Churros — Break freshly fried churros into pieces and serve alongside for dipping into the mousse. Extraordinary combination.
- Sea salt flakes — A tiny pinch on top just before serving awakens every chocolate flavor note present.

Troubleshooting: Common Chocolate Mousse Problems
My mousse is grainy or lumpy
This usually means the chocolate was too hot when you combined it with the eggs or cream. A sudden temperature shock can cause the chocolate proteins to seize and clump. Solution: let the chocolate cool longer next time (10–15 minutes), and temper the chocolate by stirring a small spoonful of the egg mixture into it before adding everything at once.
My mousse is dense and heavy, not light and airy
Over-folding is the culprit. Every extra fold deflates air bubbles. Next time, stop folding the moment you see no more white streaks — even if the mixture looks slightly uneven, it will even out during chilling. Also check that your cream was whipped to true stiff peaks, not just soft peaks.
My mousse won’t set — it’s still runny after chilling
Two possible causes: (1) the cream wasn’t whipped to stiff peaks — soft-peak cream doesn’t provide enough structure, or (2) not enough chocolate relative to the cream. Make sure you’re using the full 200g of chocolate. Low-quality chocolate with a higher sugar content and less cocoa butter can also cause setting issues — stick with brands that list cocoa butter in the ingredients.
The chocolate seized when I added the cream
Seizing (turning thick and gritty) happens when a very small amount of liquid hits hot chocolate. The fix is counterintuitive: add more liquid. Keep stirring and add cream a tablespoon at a time — the chocolate will loosen back up. This is why this recipe adds 3 tablespoons of cream to the chocolate while melting it, which prevents seizing from the start.
Chocolate Mousse vs. Ganache vs. Pudding: What’s the Difference?
These three chocolate desserts often get confused because they share similar ingredients, but they’re structurally very different:
- Chocolate mousse — Aerated. Whipped cream and/or egg whites create a light, foamy texture that melts on the tongue. Not cooked.
- Chocolate ganache — Dense. Made from chocolate and cream in equal ratios, heated together and emulsified. No air, no eggs. Used as a glaze, filling, or truffle base. The ganache topping in no-bake chocolate cheesecake is a good example.
- Chocolate pudding — Cooked. Thickened with cornstarch or egg yolks over heat. Has a smooth, custardy texture — heavier than mousse, lighter than ganache. Requires cooking and cannot be made quickly.
For lightness and elegance, mousse wins. For intensity and richness, ganache. For everyday comfort food, pudding. All three are wonderful — they just serve different occasions and preferences.
Recipe Card: Easy Chocolate Mousse
Prep time: 20 minutes | Chill time: 2 hours | Total time: 2 hours 20 minutes
Servings: 6–8 | Difficulty: Easy
Ingredients
- 200g (7 oz) dark chocolate (60–70% cocoa), finely chopped
- 1½ cups (360ml) heavy whipping cream, divided
- 4 large eggs, separated (room temperature)
- 3 tablespoons granulated sugar, divided
- 1 teaspoon pure vanilla extract
- Pinch of fine salt
Instructions
- Melt chocolate and 3 tablespoons of cream in a double boiler over barely simmering water, stirring until smooth. Remove from heat and cool to room temperature (10–15 minutes).
- Whisk egg yolks and 2 tablespoons sugar until pale and slightly thickened, about 2 minutes. Stir into cooled chocolate along with vanilla and salt.
- In a cold bowl, beat remaining cream to stiff peaks. Set aside.
- In a clean bowl, beat egg whites with remaining 1 tablespoon sugar to stiff peaks.
- Fold one-third of the whipped cream into the chocolate base to lighten it. Then fold in remaining cream and egg whites together using a gentle J-shaped motion. Stop as soon as no white streaks remain.
- Divide mousse among 6–8 serving glasses. Cover and refrigerate at least 2 hours.
- Before serving, garnish with whipped cream, chocolate shavings, or fresh berries.
Notes: For a simpler version, omit the egg whites and increase the whipping cream to 2 cups. The mousse will be slightly denser but still excellent. For food safety, use pasteurized eggs if serving to pregnant women, young children, or immunocompromised individuals — raw eggs are used in this recipe.
Frequently Asked Questions
Is chocolate mousse safe to eat with raw eggs?
Traditional chocolate mousse uses raw eggs, which carries a small risk of salmonella. For most healthy adults, this risk is minimal — but if you’re pregnant, immunocompromised, elderly, or serving young children, use pasteurized eggs (available at most grocery stores) or make the egg-white-free version using only whipped cream. The egg-free version is still delicious, just slightly denser.
Can I make chocolate mousse without heavy cream?
Heavy cream (36%+ fat) is important for whipping to stiff peaks and providing structure. Half-and-half or whole milk will not whip and cannot substitute directly. The best dairy-free alternative is full-fat coconut cream (refrigerated overnight, with the solid cream scooped off the top). Whips well and produces a legitimate mousse, though with a subtle coconut flavor that pairs nicely with dark chocolate.
How far in advance can I make chocolate mousse?
Up to 24 hours ahead is ideal. The mousse actually improves with a full night in the refrigerator as the texture firms and the flavor deepens. Beyond 24 hours, it’s still safe and tasty but may start to weep slightly (small amount of liquid separating) — simply stir gently if this happens. Do not make more than 48 hours in advance.
What chocolate works best for mousse?
A 60–70% dark chocolate bar gives the best balance of richness, intensity, and proper setting. Below 55% and the mousse will be quite sweet without much depth; above 75% and it can taste slightly bitter and may be harder to set properly. Bar-style chocolate (chopped) melts more evenly than chips, which often contain stabilizers that affect texture.
Why does my mousse taste grainy?
Graininess almost always comes from temperature shock — adding hot chocolate to cold cream or eggs. Let the melted chocolate cool fully to room temperature before combining with anything. A second cause is over-whipping the cream until it starts to break — stop at stiff peaks and don’t go further. If the graininess comes from the chocolate itself, it may have seized; add a tablespoon of warm cream and stir vigorously to rescue it.