
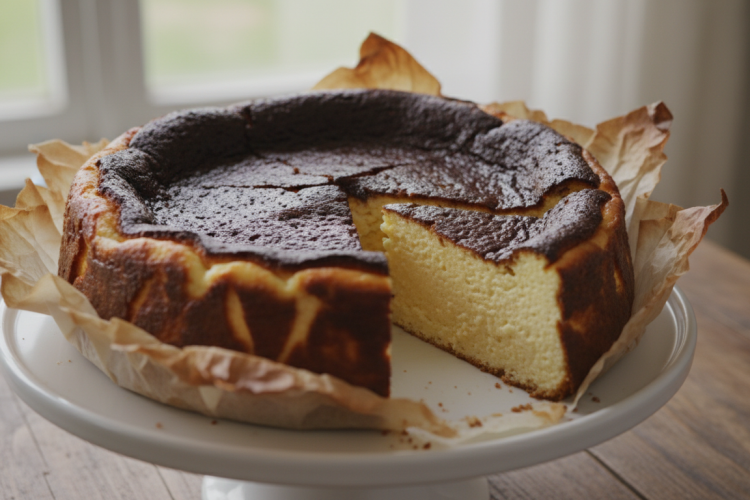
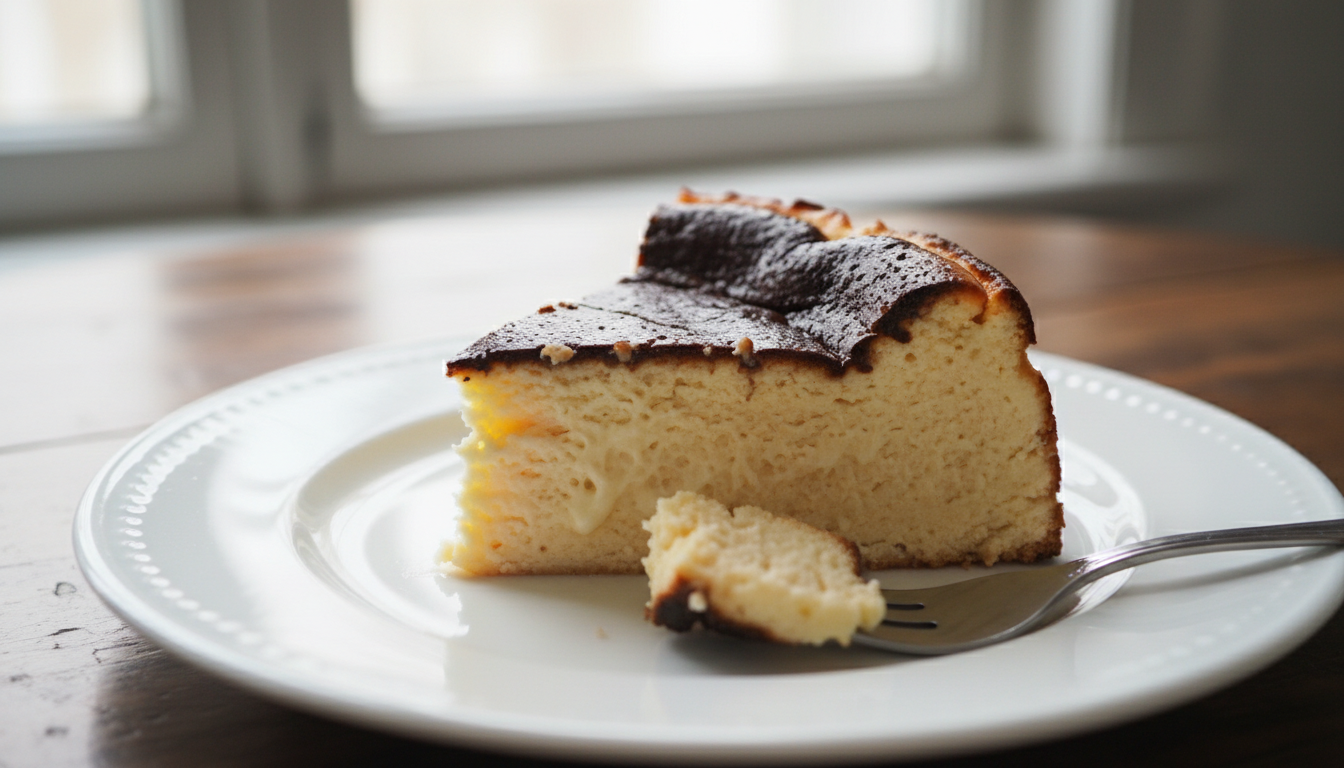
Basque burnt cheesecake is a crustless, intentionally over-baked cheesecake from San Sebastián, Spain, with a deeply caramelized, almost charred top and a silky, custard-like center. It bakes at a very high temperature—400–425°F—which burns the exterior while keeping the inside creamy and jiggly. It requires just 5 ingredients and about 60 minutes of active effort.
What Is Basque Burnt Cheesecake?
Basque burnt cheesecake — known as tarta de queso vasca in Spain — was created in the early 1990s by chef Santiago Rivera at his pintxos bar La Viña in San Sebastián, in the Basque Country of northern Spain. Unlike traditional New York cheesecake, which relies on a careful low-and-slow bake to prevent cracks, Basque cheesecake actively courts imperfection. The top is supposed to look burnt. The center is supposed to wobble. There is no crust, no water bath, and no cold-oven cooling trick required.
The technique spread globally through food media and social media around 2019–2020, and it’s now one of the most-searched cheesecake styles in the world. The appeal is its simplicity: five pantry ingredients, a bowl and a whisk, and one high-heat bake. Even if you’ve never made cheesecake before, this recipe is forgiving by design.
If you love strawberry cheesecake or classic vanilla cheesecake, this recipe will give you a completely different texture experience — denser, more custardy, and dramatically more complex in flavor thanks to the caramelization.
Why the “Burnt” Top Is the Point
The dark top isn’t a mistake — it’s the entire flavor strategy. When cream cheese batter hits temperatures above 375°F, the surface begins to caramelize through the Maillard reaction and sugar caramelization. This produces hundreds of new flavor compounds: nutty, butterscotch, slightly bitter notes that balance the rich sweetness of the interior.
The contrast between the almost-charred crust and the cool, creamy center is what makes every bite so satisfying. If you under-bake it (pulling it out too soon or at a lower temperature), you lose that complexity and end up with a pale, undifferentiated surface that tastes flat by comparison.
The high-heat bake also does something unusual to the interior: it sets the outer half-inch of the cheesecake while leaving the center just barely cooked, almost like a baked custard or crème brûlée. As it cools, the residual heat gently finishes the center without over-setting it. This is why the cheesecake must be fully cooled before slicing — rushing it will give you a soupy middle.
Ingredients You’ll Need
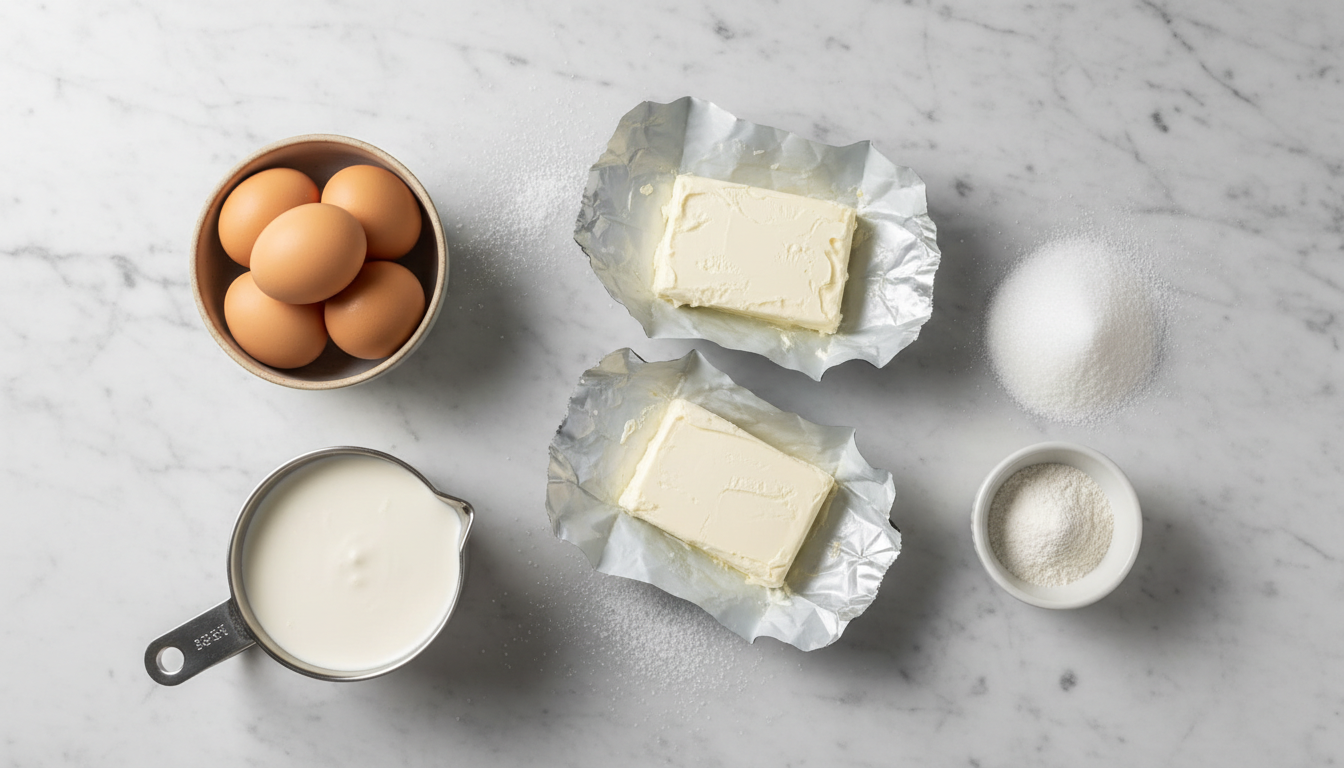
Basque burnt cheesecake uses just five ingredients. That simplicity means quality really matters — use full-fat cream cheese and real heavy cream.
- Cream cheese (900g / 32 oz, full-fat) — Use brick-style cream cheese like Philadelphia, at room temperature. Tub-style cream cheese has added water and will produce a runnier batter.
- Granulated sugar (300g / 1½ cups) — Standard white sugar. Brown sugar works too and adds a deeper molasses note to the caramelized top.
- Eggs (5 large) — Room temperature. The eggs provide structure without creating a tight, rubbery texture. More eggs = firmer set; fewer = creamier.
- Heavy cream (480ml / 2 cups) — At least 36% fat. The high fat content gives the filling its signature silky, flowing texture. Do not substitute half-and-half or light cream.
- All-purpose flour (35g / ¼ cup) — Just a small amount to stabilize the batter without making it cakey. Some recipes use cornstarch for a gluten-free option.
Optional: 1 teaspoon vanilla extract and a pinch of salt, which round out the flavor without overpowering the caramel notes from the burnt top.
Equipment
You need very little specialized equipment:
- 9-inch (23cm) springform pan — This size gives you the classic thick Basque cheesecake profile. An 8-inch pan will make a taller, slightly more jiggly cheesecake. A 10-inch will bake faster and produce a flatter, firmer result.
- Parchment paper — You’ll need two overlapping sheets to line the pan, going up the sides by at least 2 inches above the rim. The parchment molds itself to the pan and creates the rustic, pleated look on the sides of the finished cheesecake.
- Stand mixer or hand mixer — To beat the cream cheese until completely smooth before adding other ingredients. A very thorough mix here prevents lumps in the batter.
- Large mixing bowl and whisk
Step-by-Step Basque Burnt Cheesecake Recipe
Total time: ~70 minutes active + cooling time
Yield: One 9-inch cheesecake, 10–12 servings
Oven temperature: 425°F (220°C)
Step 1: Prep the Pan
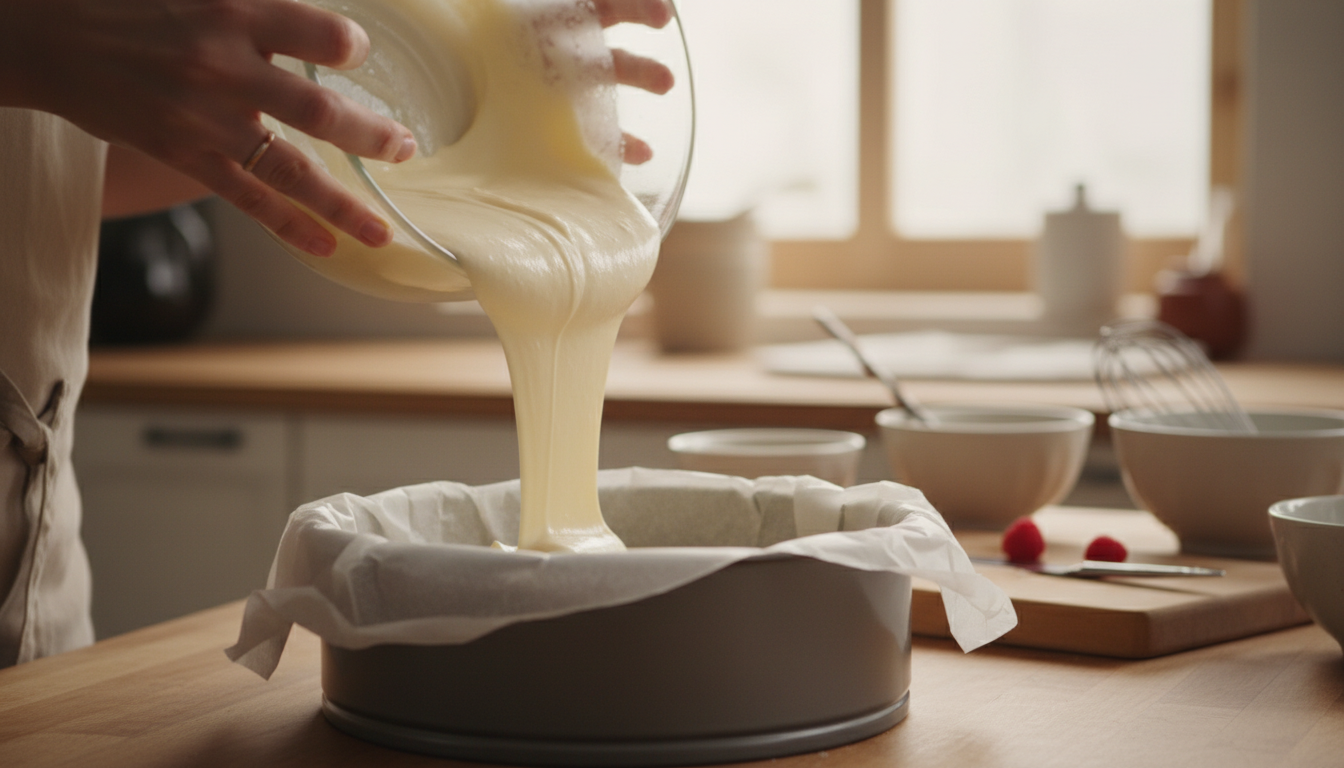
Preheat your oven to 425°F (220°C) with a rack in the center. Grease the inside of a 9-inch springform pan lightly with butter or cooking spray. Take two sheets of parchment paper and crumple each one under running water, then smooth them out — this makes the paper pliable enough to line the pan smoothly. Press both sheets into the pan, crossing them at right angles so the whole interior is covered and the paper extends at least 2 inches above the rim. The wet-crumple trick eliminates stiff creases that would leave indentations in the cheesecake.
Step 2: Beat the Cream Cheese
In the bowl of a stand mixer fitted with the paddle attachment (or using a hand mixer), beat the room-temperature cream cheese on medium speed for 3–4 minutes until completely smooth and fluffy. Scrape down the sides of the bowl at least twice. Any lumps at this stage will remain visible in the finished cheesecake and affect the texture. This is the most important step — patience here pays off.
Step 3: Add Sugar, Then Eggs
Add the granulated sugar to the cream cheese and beat on medium for another 2 minutes until well combined and the mixture looks slightly lighter. Then add the eggs one at a time, beating on low after each addition just until incorporated. Avoid overbeating the eggs — excess air incorporation causes the cheesecake to puff dramatically in the oven and then collapse and crack as it cools. Add vanilla extract and salt here if using.
Step 4: Add Heavy Cream and Flour
With the mixer on its lowest setting, slowly pour in the heavy cream in a thin, steady stream. Mix until just combined. Sift the flour over the batter and fold it in gently with a spatula, or pulse briefly on the lowest mixer speed. The batter should be very smooth, pourable, and quite liquid — this is correct. It will look more like a thick liquid than a batter at this stage. Pour it through a fine-mesh strainer into the prepared pan to catch any remaining lumps.
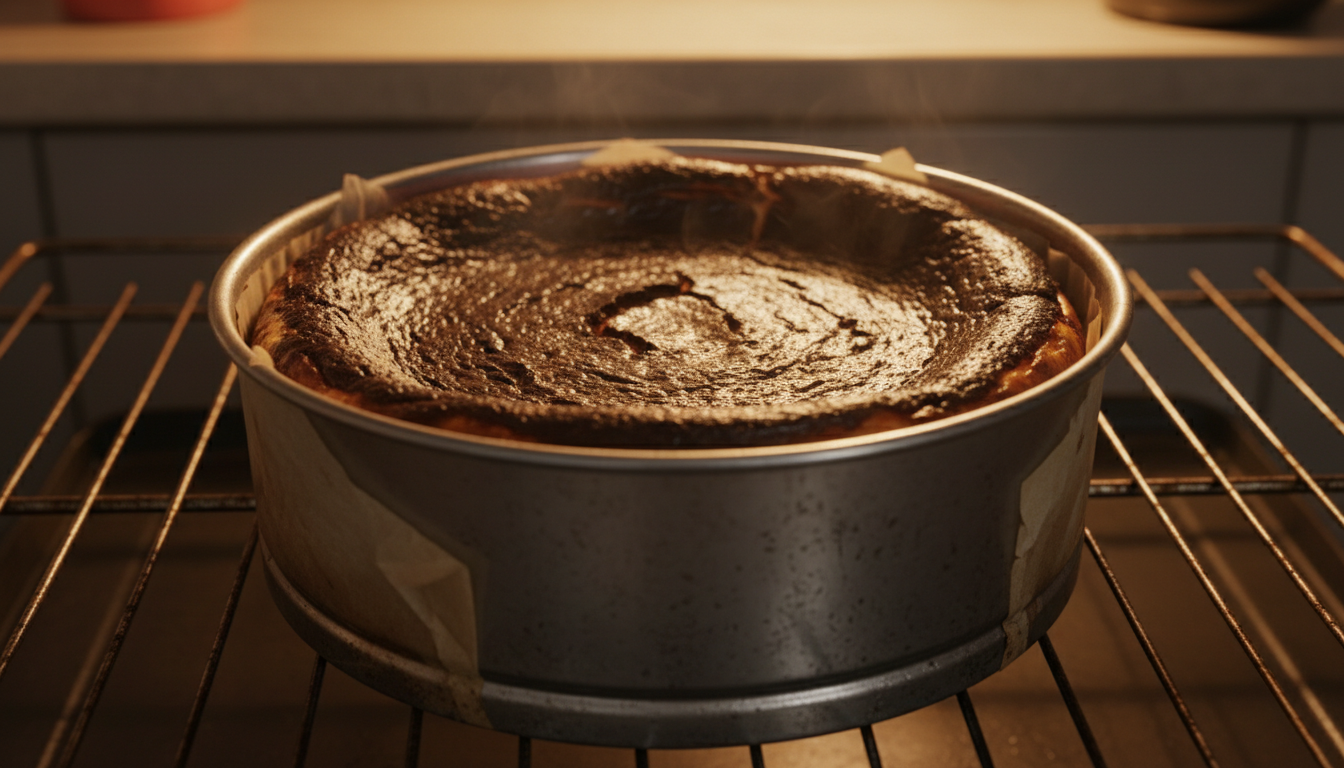
Step 5: Bake at High Heat
Place the filled pan in the preheated oven and bake for 55–65 minutes. Around the 50-minute mark, the top should be deep brown to almost black, and the cheesecake should have a significant jiggle in the center when you gently shake the pan — like Jell-O, not like a wave. The outer 2 inches should look mostly set.
Every oven runs differently. A convection oven will brown the top faster; check at the 45-minute mark. If your top is deeply caramelized but the center is still very liquid (more than 3 inches of jiggle), cover loosely with foil and continue baking in 5-minute increments.
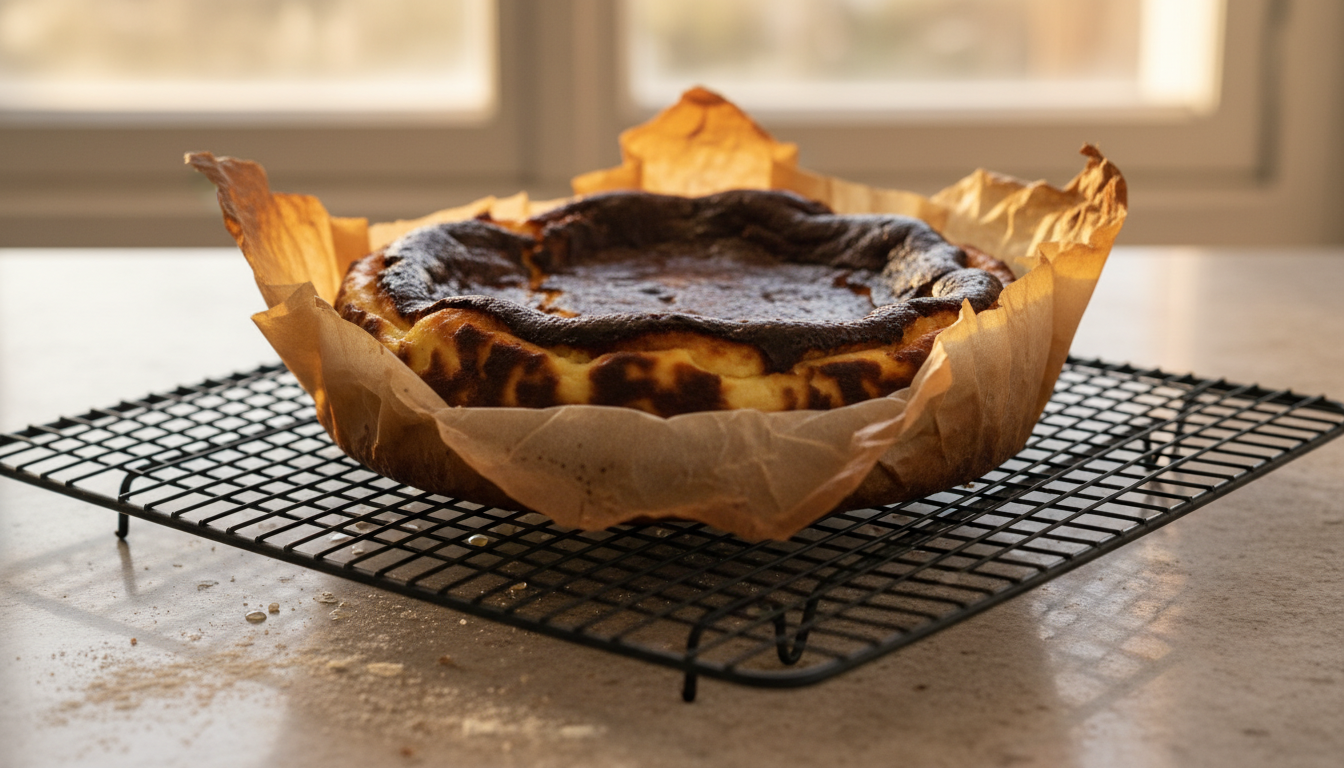
Step 6: Cool Completely Before Slicing
Remove the cheesecake from the oven. It will look alarmingly sunken and jiggly — this is normal and expected. Let it cool in the pan at room temperature for at least 2 hours. During this time, the cheesecake firms up significantly as it cools. For the best texture, refrigerate for 4–8 hours or overnight before slicing. When ready to serve, peel back the parchment paper, slice with a warm knife (run under hot water and wiped dry between cuts), and plate.
How to Tell When It’s Done
The single biggest challenge for first-time bakers is pulling the cheesecake at the right moment. Here’s what to look for:
- Top color: Deep amber to dark brown, possibly with some near-black patches at the edges. If the top is only golden or medium-brown, keep baking.
- Jiggle test: Gently shake the pan. The outer 2–3 inches should be set (moves as a single mass). The center 3–4 inches should wobble freely. If the entire surface ripples like water, it needs more time.
- Puffed sides: The cheesecake will have risen and puffed over the parchment collar. This is correct — it will sink as it cools.
- Internal temperature (optional): 150–155°F (65–68°C) at the edge, 140–145°F (60–62°C) at the center using an instant-read thermometer.
Texture Troubleshooting
Understanding why Basque cheesecake behaves the way it does helps you fix problems before they happen. If you’ve ever wondered why your baked goods sink in the middle, the same principles apply here — but with Basque cheesecake, sinking is expected.
- Cheesecake is completely liquid after cooling: Under-baked. The center temperature never reached the set point. Next time, bake 10–15 minutes longer or verify your oven temperature with an oven thermometer.
- Cheesecake is grainy or curdled: Cream cheese was too cold, or eggs were added too fast. Always use room-temperature ingredients. If the batter looks curdled before baking, strain it through a fine-mesh sieve — the heat often smooths it out.
- Top is pale after 65 minutes: Oven temperature is too low. Increase to 450°F for the last 10 minutes.
- Top is black and bitter-tasting: Slightly over-caramelized. Next time, cover loosely with foil once the top reaches the desired color and continue baking.
- Cheesecake stuck to parchment: The parchment absorbed moisture during the bake. Peel while cold (the cold fat firms up and releases more cleanly from the paper).
Serving Suggestions
Basque burnt cheesecake is traditionally served at room temperature, which is when its custardy texture is most pronounced. Remove it from the refrigerator 30–45 minutes before serving. Classic accompaniments include:
- Fresh berries: Strawberries, raspberries, or blackberries provide brightness against the rich, dense cheesecake.
- Lemon curd: A spoonful alongside each slice adds tartness and color.
- Heavy cream or crème fraîche: A small pour of cold cream into the center of a warm slice is a traditional Basque serving style.
- Nothing: The cheesecake is genuinely complete on its own. Its burnt top, creamy center, and caramel sweetness need no embellishment.
Pair it with strong espresso, a Pedro Ximénez sherry, or a Sauternes for a dessert course worth lingering over. If you’re hosting a dinner party and also want to serve a plated dessert course, our easy panna cotta recipe makes an elegant lighter companion to a slice of this cheesecake.
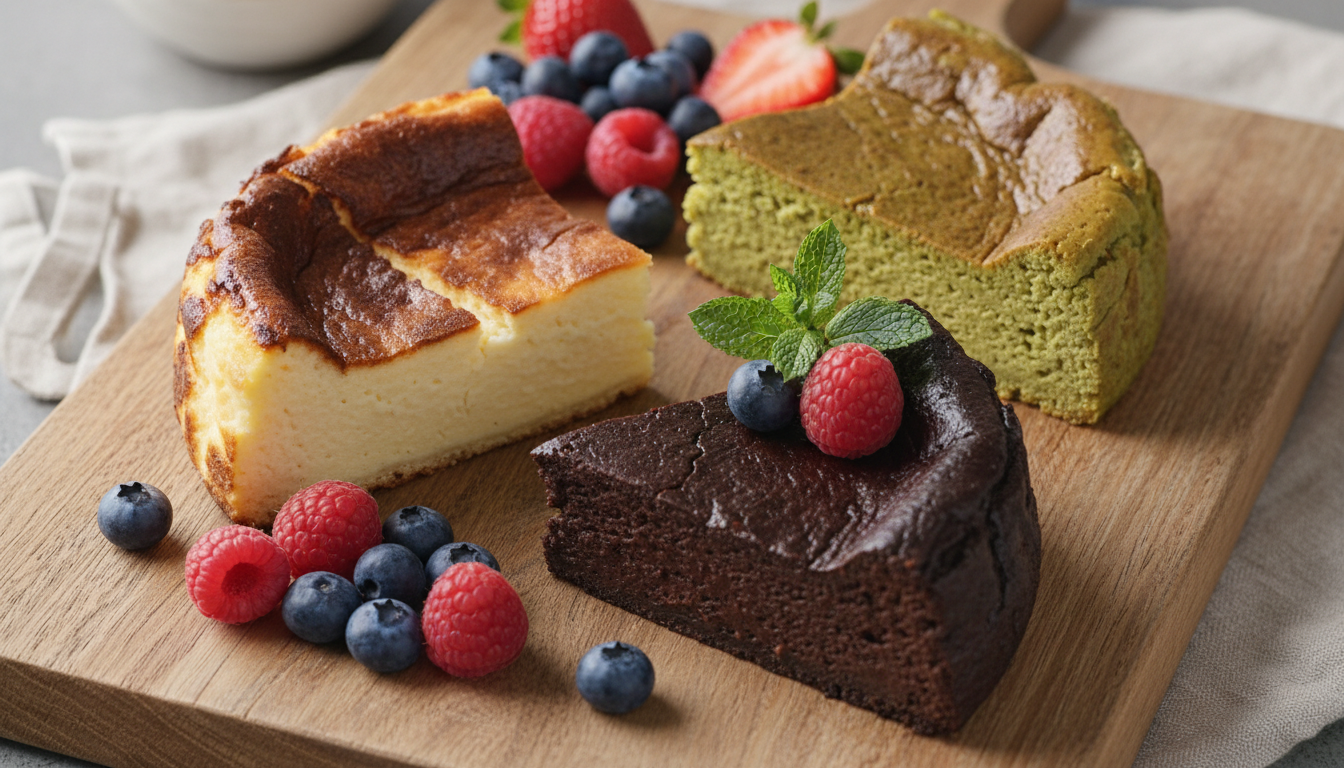
Variations to Try
Once you’ve mastered the base recipe, Basque cheesecake adapts remarkably well to flavor additions. The high-fat batter absorbs flavors evenly, and because there’s no crust to balance, variations are low-risk.
- Matcha Basque cheesecake: Whisk 2 tablespoons of sifted ceremonial-grade matcha into the cream cheese before adding the eggs. The vivid green interior against the burnt brown exterior is visually striking.
- Chocolate Basque cheesecake: Fold 120g of melted, cooled dark chocolate (70%) into the batter after adding the flour. Produces a deeply fudgy, ganache-like interior.
- Lemon Basque cheesecake: Add 2 tablespoons of lemon zest and 2 tablespoons of fresh lemon juice to the batter. Pairs beautifully with fresh berries. See our full lemon cheesecake recipe for more lemon cheesecake ideas.
- Brown butter Basque cheesecake: Brown the heavy cream in a saucepan until it smells nutty and develops golden solids, then let it cool completely before using in the recipe. Adds a hazelnut depth to every bite.
- Miso Basque cheesecake: Beat 3 tablespoons of white shiro miso into the cream cheese. The umami and salt from the miso amplify the caramelized top and create an unexpectedly savory-sweet experience.
Storage Instructions
Basque burnt cheesecake stores very well, making it an excellent make-ahead dessert for entertaining.
- Room temperature: Up to 4 hours, covered loosely with a cloth.
- Refrigerator: Up to 5 days, wrapped tightly in plastic wrap or stored in an airtight container. The texture actually improves on day 2 as the flavors meld.
- Freezer: Up to 2 months. Wrap individual slices in plastic wrap, then in foil, and freeze in a zip-lock bag. Thaw overnight in the refrigerator. The texture holds surprisingly well after freezing.
How This Compares to Other Cheesecakes
Basque cheesecake occupies a distinct niche in the cheesecake spectrum. Here’s how it differs from the styles you’re likely familiar with:
| Style | Crust | Bake Method | Texture | Top Appearance |
|---|---|---|---|---|
| New York | Graham cracker | Low & slow, water bath | Dense, firm | Pale, smooth, no cracks |
| Basque | None | High heat, no water bath | Creamy, custardy | Dark brown to black |
| No-Bake | Graham cracker | Refrigerator set | Mousse-like, soft | Pale, topped with fruit |
| Japanese | None | Low & slow, water bath | Extremely light, soufflé | Pale golden |
If you’ve made our New York cheesecake or no-bake cheesecake, Basque will feel almost reckless by comparison — no crust to press, no water bath to fuss over, no careful monitoring for golden edges. That’s exactly the point. It’s the most forgiving cheesecake you can make, dressed up in dramatic flavor.
YouTube: Basque Burnt Cheesecake
Frequently Asked Questions
Why does Basque cheesecake have a burnt top?
The dark top is intentional and results from baking at a very high temperature (400–425°F). The heat caramelizes the surface sugars through the Maillard reaction, creating complex, slightly bitter, nutty flavors that balance the rich sweetness of the creamy interior. It’s not a mistake — it’s the defining feature of the recipe.
Does Basque cheesecake need a water bath?
No. Unlike New York cheesecake, Basque cheesecake does not use a water bath. The high fat content of the batter (from cream cheese and heavy cream) prevents the eggs from scrambling or the surface from cracking, which is why a water bath is unnecessary. Simply place the pan directly on the oven rack.
How jiggly should Basque cheesecake be when it comes out of the oven?
Very jiggly — the center 3–4 inches should wobble freely like Jell-O when you gently shake the pan. The outer edges should look mostly set. This level of jiggle means the center will firm up to a perfectly creamy, custardy texture as it cools. If you wait until the center looks set in the oven, the cheesecake will be overbaked and rubbery when cold.
Can I make Basque cheesecake gluten-free?
Yes. Replace the all-purpose flour with an equal weight (35g) of cornstarch or a 1:1 gluten-free flour blend. The texture is nearly identical to the original. Since the recipe contains no crust, you only need to swap this one ingredient. All other ingredients — cream cheese, eggs, heavy cream, sugar — are naturally gluten-free.
How long does Basque cheesecake last in the fridge?
Up to 5 days, tightly wrapped. The flavor actually peaks on day 2 as the caramelized top softens slightly and merges with the creamy center. For longer storage, freeze individual slices for up to 2 months and thaw overnight in the refrigerator before serving.